Key Concepts: Array Based Instancing
What is RailClone?
RailClone is designed to help artists create sophisticated reusable parametric models using an easy-to-understand node based editor. At the heart of RailClone are two array-based Generators. These use rules to combine, transform, deform, slice, bevel, UV map, and distribute meshes known as Segments. once you understand how generators work, creating your own unique RailClone objects is simple and fun!
Compared to many other parametric modelling tools, RailClone works at a much higher level of abstraction. RailClone isn't a visual programming tool, it's a sophisticated array based modeller with tremendous Instancing power. There's no need to create complex algorithms or programmatically generate meshes from scratch, instead RailClone uses modular pieces of geometry created using standard modelling tools as its building blocks. These are assigned to different parts of an Array and manipulated based on the instructions contained in rule-sets. We call the combination of rules, arrays and segments a Style.
For example, the image below illustrates a rope barrier style created with RailClone.

This style is created using only two Segments.
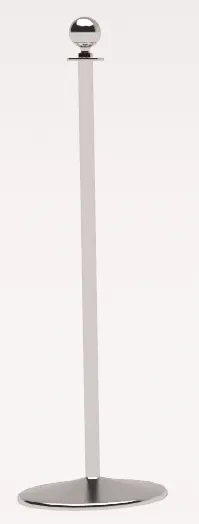
A post....

...and a rope.
These two segments are organised into a one dimensional array by a Generator, which uses a simple rule-set. If we were to write out this rule-set in English it would read as follows:
- Create a 1 dimensional array deformed along a Spline math.
- At the Start if the spline, add a post.
- At the End if the spline, add a post.
- If there is a Corner vertex, add a post.
- Along the length of the spline, add Evenly spaced posts every 1.2m.
- Between all these posts, add a rope and scale it, so it fits exactly between the posts.
In RailClone, using the node based Style Editor, the rule-set looks like this:
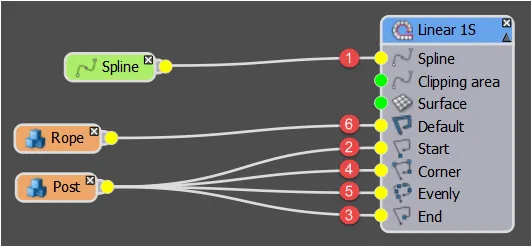
As you can see this array has 5 parts: the start, end, corner, evenly and default. Each of these parts is represented by an Input in the generator's node. To add geometry to the array, it is only necessary to wire a Segment to an input.
This example contains the 3 essential ingredients to create a RailClone object, a Generator (rule-set), Base object(spline) and at least one Segment(geometry). In the node tree shown above, the Linear 1S node is a type of Generator which creates the array, the Spline node is a Base Object and determines the path, and the Rope and the Post nodes are Segments that add the geometry. Let's look at these 3 components in more detail.
Generators: RailClone's two array types
To create parametric objects with RailClone you compile geometry using one and two-dimensional arrays. Each of these two arrays is created using a different generator, and each has different inputs. The L1S generator is simplest of the two with 5 inputs. This generator is the foundation of RailClone's approach to modelling.
RailClone's second generator is designed to create 2d arrays and is more sophisticated with a total of 12 possible inputs. If you stack several L1S arrays on top of one another you get a 2d array and this, in essence, is how the A2S generator works. Because of this relationship between the two generators, understanding the L1S generator is the most important step in learning RailClone.
The one dimensional or L1S array
As we've mentioned the L1S array has 5 inputs. Each of these relates to a position on the X Axis of the array and/or the position on the base spline. To create parametric objects with RailClone, it's essential to understand how these 5 elements interact. The following animated image and descriptions illustrate the inputs used by the L1S Generator and their position on a base spline.Though it looks simple, it's a deceptively powerful system that can generate a limitless number of different styles.

- Start: this input is used to position a segment at the start of the array.
- End: this input is used to position a segment at the end of the array.
- Corner: this input is used to add a segment at each of the intermediary vertices of the spline. You can set this so that it only creates a segment on certain types of vertex i.e. corner. bezier-corner, bezier, smooth, or if you prefer, all of these.
- X Evenly: this input is used to create evenly spaced segments along the spline. The distance between them is fully adjustable and there are several algorithms available to calculate the spacing.
- Default: this is used to fill in the remainder of the array and in the event that the other nodes have no inputs. If an input is left empty, the segment wired to default will be used in its place.
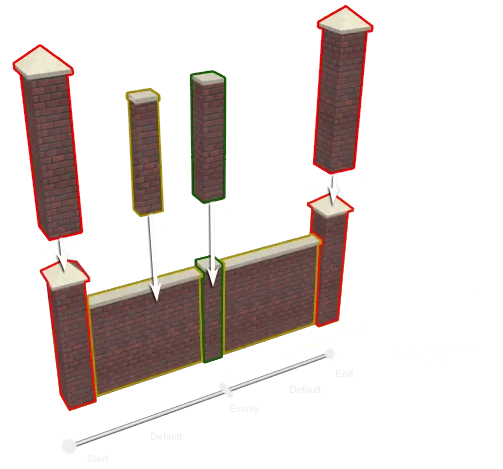
To see this in action, examine this image from our Masonry Wall tutorial. It illustrates the segments used by the style and the input slots to which they're attached.
The two-dimensional or A2S Array
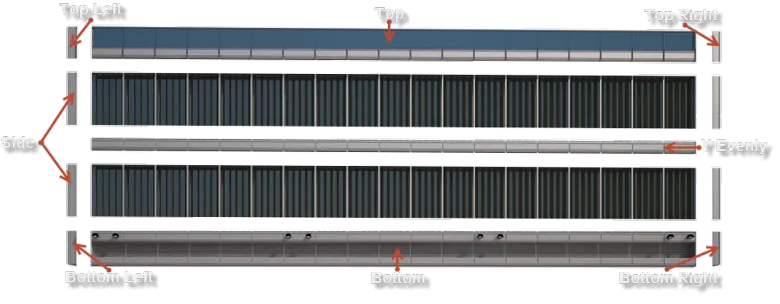
Using the A2S Generator, segments can be positioned and deformed in a two-dimensional grid with separate target slots for top, bottom, sides, each corner and evenly spaced rows and columns. This powerful generator is great for walls, pavements, façades, roofs and many other advanced structures. The image and descriptions below illustrate the inputs used by the A2S Generator, and their position in the array.

- Left Bottom Corner: use this input to position a segment in the bottom left hand corner the array.
- Right Bottom Corner. use this input to position a segment in the bottom right hand corner the array.
- Left Top Corner: use this input to position a segment the top left hand corner the array.
- Right Top Corner: use this input to position a segment in the top right hand corner the array.
- Left Side: use this input to add a column of segments on the left hand side of the array.
- Right Side: use this input to add column of segments on the right hand side of the array.
- Inner Corner: use this input to add a column of segments at each of the intermediary vertices of the construction spline.
- Bottom Side: use this input to creates segments in the bottom row of the array
- Top Side: use this input to creates segments in the top row of the array
- X Evenly: use this input to creates evenly spaced columns of segment.
- Y Evenly: use this input to create evenly spaced rows of segments.
- Default: use this input to assign a segment that is used to fill in the remainder of the array and in the event that the other inputs are empty.
The following image is from our Curtain Wall tutorial and illustrates how the relationship between the segment's geometry and the input slots described above creates a working style. Note that although this generator has 12 input slots, it isn't necessary to use them all. In this example only the corners, sides, top, bottom, Y Evenly and default have been used. Inner Corner and X Evenly were not required to create this style. When an input is not used the generator is able to intelligently reconfigure itself to use only the inputs that are active.
The inputs used for a curtain wall style
 Railclone Render of the curtain wall style
Segments
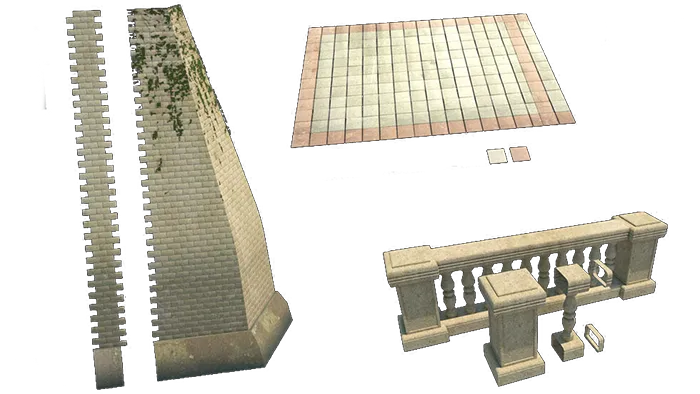
Creating new styles with RailClone necessitates thinking about your models as repeatable parts of a jigsaw, that slot together into a 1D or 2D array. We call these jigsaw pieces Segments, they are the individual building-blocks, duplicated and combined by the generators, to create a final model. A segment could for example be a single complete object distributed along a path (for example, a lamp-post), or a modular set of parts that snap together to create a precise unified mesh (for example, a space frame). The geometry used for Segments is typically very specific to each style, but the image below show 3 different RailClone objects from the Seaside Promenade tutorial with their respective segments.
Base Objects
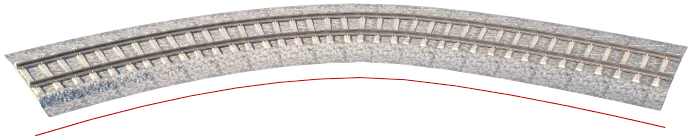
To set the size of an array you have two options, either use scene units to specify the length and height, or use splines as paths for geometry to follow. These paths are referred to as Base Objects. Depending on the type of generator used you can employ up to 3 splines. For example this Railway preset from the included library uses the spline marked in red to deform the track.
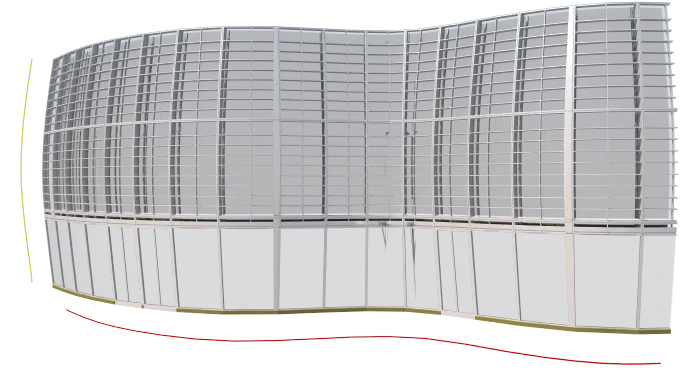
When using A2S generators (two-dimensional arrays), two splines can be used, one for the X Axis and another for the Y. In the curtain wall example below, the red spline governs the path while the yellow determines the height. Both splines can be curved to generate geometry that would be time-consuming to create using other tools or techniques.
In addition to defining the axes of a generator, the third type of spline base objects functions as a clipping area. These splines must be closed and RailClone uses Max's boolean functions to include or exclude geometry by slicing segments. This will be discussed in more detail in the Intermediate guide.
Operators
Operators allow you to perform all kinds of modifications to segments. These nodes allow you to transform, mirror, combine, and sequence segments; randomise geometry, material IDs or UVW coordinates; combine segments to form a new composite object, create conditional rules and much more.
Parameters
Finally, Parameters allow you to link the properties of generators, segments and operators to one-another or to numerical nodes. Use parameters to link different parts of a RailClone style together and make adjusting multiple objects from a single input a cinch. Mathematical relationships can be added between properties by using Arithmetic operators and for the more adventurous you can even write custom expressions.
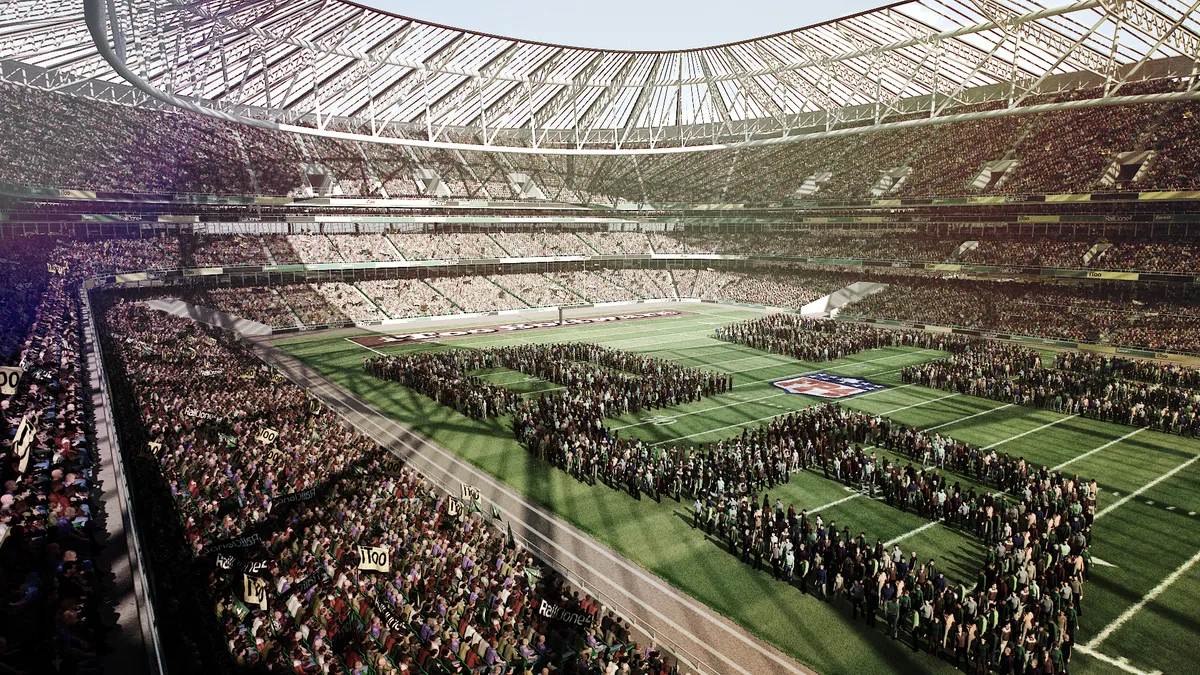
Instancing
RailClone shares the instancing power of Forest Pack Pro. It has been designed from the outset to create huge amounts of geometry using popular rendering engines. Any segment that is not deformed or sliced is instanced automatically, saving memory and improving render-times.This happens automatically behind the scenes, though as a general rule the more you minimise deformation and slicing, the more optimised your model will become.
For an example of instancing, take a look at the stadium scene (show below) from our 5 part tutorial series. This scene uses RailClone to create all the seating (and almost everything else). Each seat model has 14,018 polygons and the stands contain approximately 50,000 chairs. This gives us a total of 700,900,000 polygons, and that's before adding the crowds, flags, roof, and grass!