Macros
Overview
Macros allow you to group a sub-graph inside a single node. In that way you can create brand-new nodes with unique functions. Conceptually macros open up a completely new workflow for RailClone that allows you to build more involved styles without cluttering your graph. Working this way allows you to see generators, operators and base objects as the atomic elements from which other, more sophisticated, nodes can be built.
Macros can output 3 different types data. From RailClone 7 onwards, a single macro can combine all of the following into a single node.
- Numeric Macros that output a value.
- Geometry Macros that are used to manipulate segments
- Generator Macros that can be used to create completely new types of generator by combining one or more 1D and 2D arrays
Just like the built-in nodes, custom macros can have their own inputs and parameters. These are easily created by just adding Input or Numeric nodes to the Macro's graph.
Macros are easy to share. You can save any macro to an .rcm file that can be distributed in your studio or with other friends and colleagues online.
To help you get started, a number of examples are included in the library. There's also a user library where you can save the macros you create, making it a really efficient way to save and access graph snippets that you use regularly. Moreover, .rcm files can be imported to your user library in just a couple of clicks, making it easy for users to distribute their new creations and extend RailClone's feature set.
The macros library is managed by Update Manager. You will be notified when new sample macros become available.
Procedures
To load a macro from the library
-
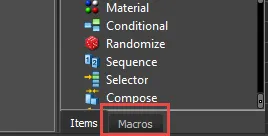
Click on the Macros tab below the Items List to show the macros library
-
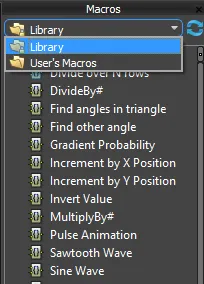
Choose from either the built-in macros or your custom macros from the drop-down list at the top of the Macros pane.
-
Drag a macro from the Macros List to the Construction View.
To create a new empty Macro
- Drag a new Macro from the Items List to the Construction View.
To edit a Macro
Either
- Double-click on the macro node. A new tab will open containing the Macro's sub-grath.
Or
-
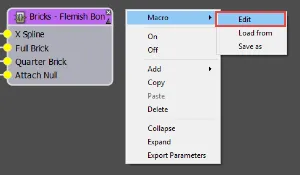
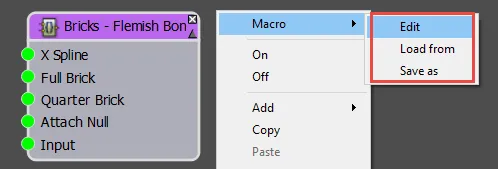
Right-click on a Macro node and select Macro > Edit.
-
A new tab will open containing the Macro's sub-graph. Any changes or additions you make here will be evaluated in real-time. In RailClone you never need to evaluate your graphs.
To add base object inputs to a Macro
-
Add a new Input node
-
From the Properties Panel, change the Type to Spline. Surface or Clipping Spline depending on your intended usage.
-
Rename the Input node 4. If you switch back to the main view, you should see a new input will now be added to the Macro node with the same name.
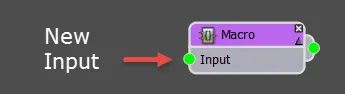
To add segment inputs to a Macro
- Add a new Input node
- From the Properties Panel, change the Type to Segment. Rename the Input node
- If you switch back to the main view, you should see a new input will now be added to the Macro node with the same name.
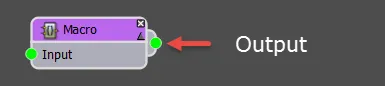
To add outputs to a Macro
-
Add a new Output node
-
From the Properties Panel, change the Type to either Numeric or Segment. Rename the Output node
-
If you switch back to the main view, your macro will now have an Output.
-
Add more outpur nodes if you need to output multiple types of data.
To create a generator Macro
- Add Input nodes as described above.
- Wire the input nodes to one or more generators. There is no need to include an Output node,
To change the order of inputs
-
Go to Macro > Define Inputs Order. Select an input and use the arrows to change its order in the list.

To add parameters to a Macro
- Create a new Numeric node for each parameter you wish to create.
- Go to the Properties Panel and change the type of number. Choices are integer, float, percentage, scene units and boolean.
- To automatically create an input on the macro's node for the parameter, enable Exported by Default.
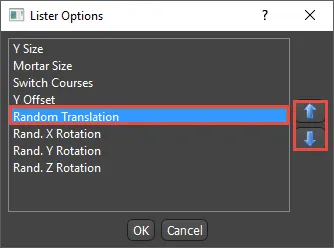
To change the order of parameters
-
Go to Macro > Define Parameters Order. Select a parameter and use the arrows to change its order in the list. This will change the order in which the display in the Macro's Properties Pane.
To collect groups parameters into categories
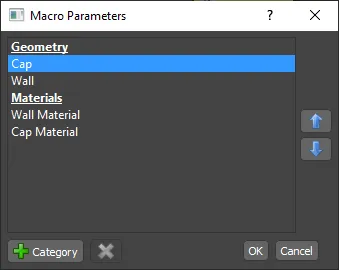
- Go to Macro > Define Parameters Order. Click on the Add Category button.
- Enter a name for the new category.
- Move it into position using the up and down arrows.
- To edit the name of an existing category, double-click on it and enter a new name.
To reset parameters to their default values
- Right-click on the macro and select Macro > Reset Paramaters.
To add macro name and description
-
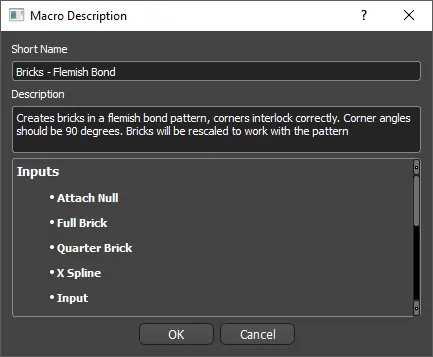
Go to Style > Edit Description.
-
Enter a Name and a Description for the Macro
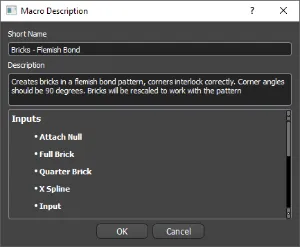
-
Now clicking in the Macro's Properties will display this information. If you save the Macro to a library, it will also display if you hover the mouse over its name.

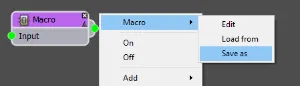
To save a Macro
Either
-
In the Macro's tab, go to Macro > Save As
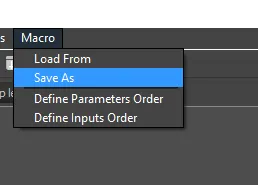
Or
-
Right-Click on the Macro node and select Macro > Save As.
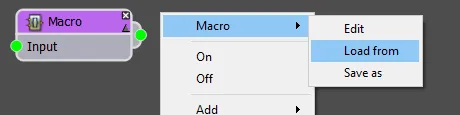
To Load a Macro
Either
-
In the Macro's tab, go to Macro > Load From

Or
-
Right-Click on the Macro node and select Macro > Load From
To save a Macro to the user library
- Follow the save procedure described above and save your files to
C:\Users\[USERNAME]\Documents\Itoo Software\RailClone Pro\macroswhere USERNAME is your windows' username. - You can create as many folders as you need in this location to organise your Macros
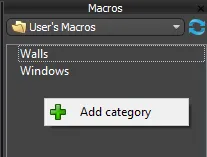
- New folders can also be created directly in RailClone's style editor by right-clicking on the Macro panel and selecting Add New Category
You can quickly locate the location of your editable macros library by following these steps
-
In the Style Editor, right-click on a category or a macro and select Open in Shell
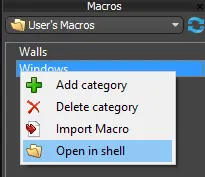
-
Note the location of the saved files
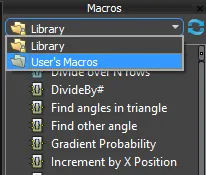
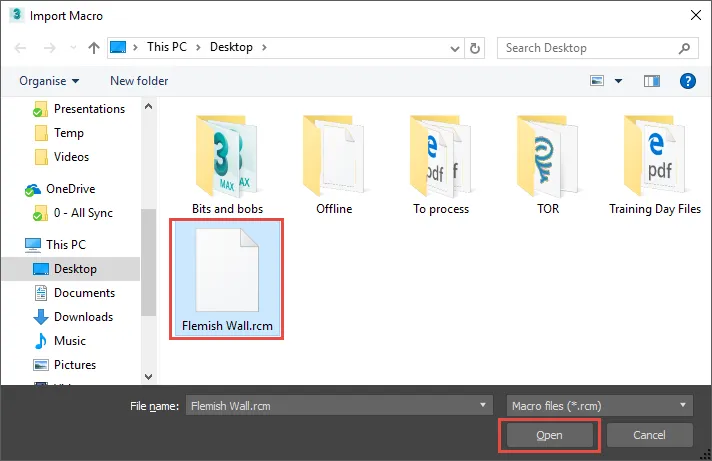
Importing a macro file to the User Library
-
Click on the Macro Tab to open the Macros List
-
Switch to a User Library location using the drop-down list at the top of the Macros pane
-
Select the category you wish to add the saved macro to, or create a new one by clicking in a blank area of the Pane and selecting Add New Category
-
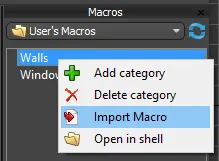
Right-Click on the Category and select Import Macro
-
Locate your macro (they're saved as .rcm files) and click Open
-
The file will now be copied to your Custom macros folder and will be available every time you use RailClone.
Interface
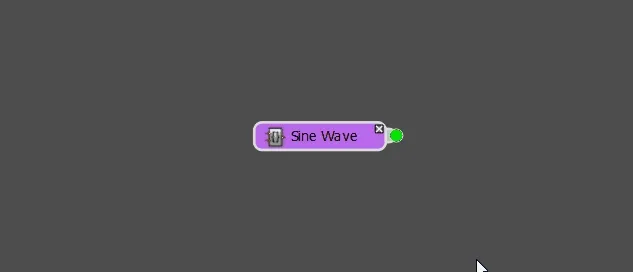
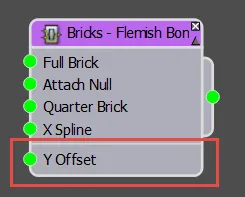
Macro Node
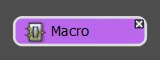
A node that acts as a container for a sub graph. Macro nodes can either output numeric data, segment data, or with no output they can act as a generator
The properties panel shows all the parameters contained in the Macro. Each parameter is represented in the macro by a Numeric node.
Right-Click Menu
Right-click on a node to either
- Edit the macro
- Save the macro
- Load macro from a file - this will replace any existing contents of the macro
Editing a macro opens the sub-graph in a new tab.

In this tab you have 5 new items in the drop-down menus.
Style > Edit Description
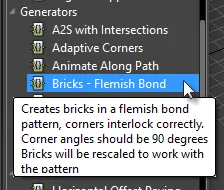
Opens a dialog to edit the name of the macro and add a description. It also lists all the inputs and parameters used by the style. This information will be displayed whenever a user clicks on the
button from the Properties panel. If you add the macro to a library it will also disalay when you hover the mouse over a macro's name in the Macros List.
Macro > Load From
Replace the contents of the macro from a .rcm (RailClone Macro) file.
Macro > Save As
Save the contents of the macro to a .rcm (RailClone Macro) file.
Macro > Define Parameter Order
Defines the order in which the parameters display in the properties panel. To change the order of a parameter, select it from the list and use the arrows to move it up or down. You can group parameters into categories. Click on the + button to add a new category and move its location in the list using the arrows.
Macro > Define Inputs Order
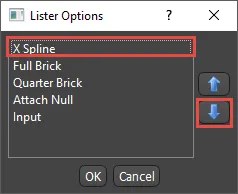
Defines the order in which the inputs display on the macro node. To change the order of an input, select it from the list and use the arrows to move it up or down.
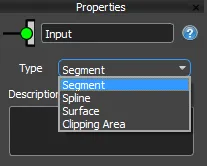
Input Node
Add a new Input to the macro node that is used to connect objects like splines and segments
Type
Defines the type of input to be created
Segment. use to connect geometry.
Spline. use to connect splines for use with the X Spline and Y Spline input of Generators.
Surface. use to connect surfaces for use with the Surface input of Generators
Clipping Area. use to connect splines for use with the Clipping Area input of Generators.
From RailClone 6 onwards, when copying and pasting a Numeric, Spline, Surface, or Segment node into a macro it will be switched for an Input node with the correct type automatically.
Output Node
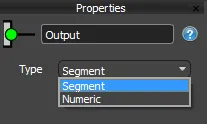
Add a new output to the macro node. This defines the type of macro you are creating. It is not mandatory to add an Output node, if you add generators instead then the macro can be used to generate arrays.
Type
Defines the type of output to be used
Segment. use to output geomety
Numeric. use to output numerical values
From RailCone 7 and onwards, multiple output node scan be used per macro. In previous version, only one output could be used.
Numeric
Creates a new Numeric parameter will be accessible and editable from the Macro's properties pane.
Type
Defines the type of number to be used
Integer. use for whole numbers
Float. use for decimal numbers
Percentage. use for percentages (Usually with scale values)
Scene units. use for measurements in scene units
Booleans: use for true/false logic operations
Selector: use to create a drop-down list of values
Default Value
The value that is used when the macro is loaded and the parameter has yet to be edited by the user.
Limits
Use this to constrain the input range between two values.
Exported By Default
Check this to add an input for the parameter to the Macro node automatically.
Any of a Macro's parameters can also be exported by right-clicking on the Macro node and selecting Export Parameters. this option merely ensure that a node is always exported when the macro is created. It is useful for saving time when you find you always need an input to be available, for example for a Macro that performs and arithmetic function on a numeric input.
Macro Library
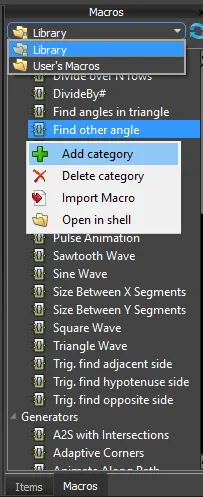
The Macro Library includes all the built-in and user generated macros. It provides a simple convenient location to manage and access your content.
Location Selector
Enables you to switch between built-in and user-generated macro librarys. Built-In macros are managed by the Upload Manager and you may periodically receive notifications about new macros as content becomes available.
You should not edit content in the Library location, this is managed by RailClone and anything you save here can be overwritten
User's Macros contain your content. By default, this folder is located at
C:\Users\[USERNAME]\Documents\Itoo Software\RailClone Pro\macros where USERNAME is your windows' username.
Right-Click Menu
with options to:
Add category. Adds a new category to help you organise your macros. In reality, it is creating a new folder in your user libraries location.
Delete category. deletes a category and its contents
Import Macro. copies a macro saved as an .rcm file to the specified category.
Open in shell. opens Windows explorer to reveal the location of the selected file or category