RailClone Spline Modifier
Overview
The RailClone Spline modifier allows the user to add markers to a path at any point, with affecting the existing vertex count or shape of the existing spline. Each marker can be
used to place geometry exactly where you need it. In previous versions of RailClone, users would add vertices to achieve something similar, but unlike vertices, markers do not affect the shape of the spline, so they can be easily added and repositioned without you having to worry about affecting the path. The RailClone Spline modifier
offers several controls to help you to create procedural layouts by positioning markers using real-world distances or percentages in relation to the start and end of the spline, or from specific vertices.
You can even add multiple markers simply by clicking on the spline. Once created, a Marker's position can be edited using parameters, or by selecting them in the viewport and simply sliding them along the spline with the mouse.

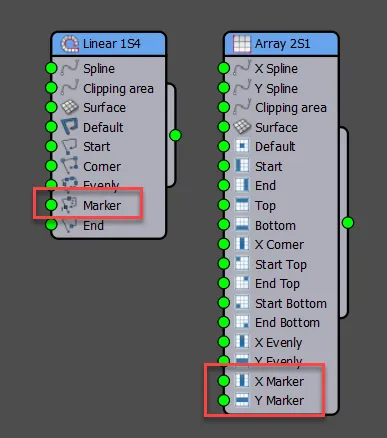
To support markers, generators now have new marker inputs. For the L1S generator, there is a single input for the base spline, for the A2S generator there are two marker inputs, one for the X spline and one for the Y Spline.
For creating even more flexible styles, Markers also have the benefit of several parameters that can be used to control nearly any aspect of a RailClone graph. Each Marker has an Index value that can be used in conjunction with the updated Selector operator to choose geometry. Each marker also has 9 additional multipurpose parameters that can be used to control pretty much anything you like. For easy recognition of each parameter's purpose, they can be renamed and set to one of three unit types.
Finally, to make it easier to share and reuse styles that need markers, the RailClone style editor has a new interface for creating RailClone Spline presets. This feature allows you to create sets of parameter names and unit types that become available to select in the RailClone Spline modifier using a handy drop-down list.
Banking
In RailClone 5 we also introduced Banking gizmos to the RailClone Spline modifier.
By simply adding easy-to-edit gizmos using the RailClone Spline modifier you can control the banking angle at any point along a spline. Just rotate a marker and the geometry twists, turns, and smoothly deforms to match.
Banking cannot be used with an A2S generator that uses free mode. If free mode is enabled then banking is disabled automatically.
For even greater control, the interpolation of the banking is controlled using a simple value that goes from linear at one end, to smooth at the other.
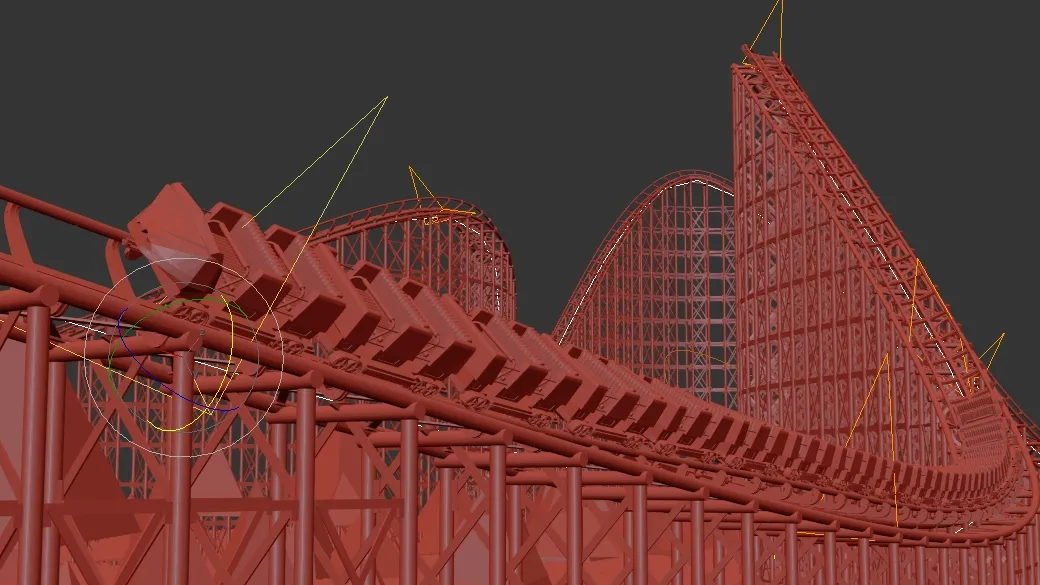
Banking can also be overridden per segment using settings added to the transform node, or disabled completely for specific generators for when you want to mix banking and non-banking geometry like in the rollercoaster example shown in the images above. If you want even more control, then it is possible to add multiple RailClone Spline markers and tell each generator to choose the one that they should use to combine completely different banking angles controlling separate objects on a single spline.
Procedures
To add markers to a spline
- Select a base spline
- Go to the modifier list and select RailClone Spline Modifier. Click on the button to add a new marker
- Choose the reference type. Choices include Start. End and Vertex. Choose whether you want a marker whose position is relative to the splines length, in which case choose Percentage or if you want an absolute measurement, in which case choose Distance.
- Move the marker into position using the Percentage or Distance values
To use Marker ID to choose geometry
-
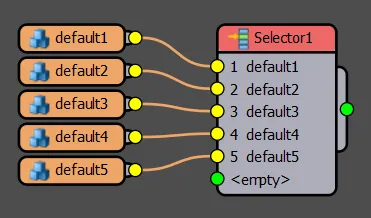
In the RailClone style, wire your segments to a Selector operator
-
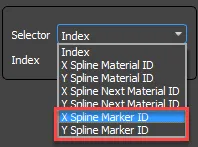
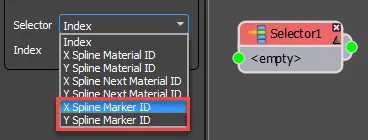
Change the Selector Operator's mode to XMarkerID or YMarkerID
-
Wire the Selector operator to the Generator's Marker input
-
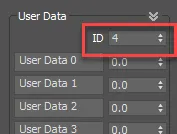
Apply an RailClone Spline Modifier and add markers as described above 5. For each marker, change the User Data > ID value to choose the segment
To move a marker or banking gizmo with the mouse
-
In the modifier stack, select the Marker or Banking sub-object level
-
Select the marker you wish to move in the viewport.
-
Use the mouse to slide the Marker along the spline
Moving a marker with the mouse resets Reference mode to Start
To add banking gizmos to a spline
- Select a base spline
- Go to the modifier list and select RailClone Spline Modifier. Go to the Banking rollout
- Click on the Create button
- Click on the spline to add one or more markers.
- Edit the banking angle for each marker either visually using Max's Rotate tools, or using the Angle value
- You can also move the marker along the spline using the Percentage values or using Max's move tool.
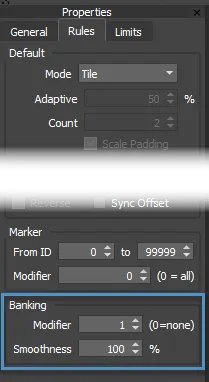
To disable banking for a generator
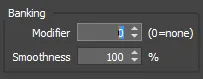
- Select the generator which you wish to ignore banking.
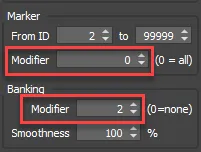
- Set Rules > Banking > Modifier to 0
To override banking for a segment
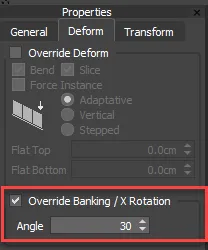
- Wire a Transform node after the segment you wish to control.
- Enable Deform > Override Banking/X Rotation. Set then banking value
To use multiple RailClone Spline modifiers
-
Create 2 or more RailClone Spline modifier on a base spline.

-
Go to the Generator's Rules tab and use the Modifer parameter to choose the RailClone Spline Modifier to use. Numbers count from the top of the stack downwards
-
For Markers, you can use a value of 0 to use all the Modifiers. 4. For Banking, you can use a value of 0 to disable banking effects.
Interface
Interface components
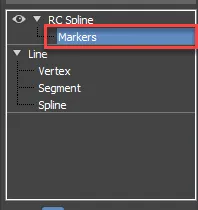
Markers
Markers List
Displays a list of all the markers created by the selected modifier. Multiple markers can be selected and batch edited by holding down Control while clicking to select one at a time, or holding down Shift and clicking to select a range.
Add a new Marker.
Deletes the Marker(s) selected in the list.
Adds multiple Markers. After pressing the button, click on the spline to add Markers.
Properties
Name
Used to assign a name to each marker. If left, default naming is used
Spline
Selects the sub-spline to which the Marker will be applied. if All is checked a Marker is created on each sub-spline.
Percentage
In Start and End mode, positions the marker based on a percentage of the spline's length. In Vertex modes,
positions the marker based on a percentage of the spline section's length.
Distance
Positions the marker based on an absolute measurement from the reference point. Measured in scene units.
Reference
Start: Measures the markers position from the start of the spline.
End: Measures the markers position from the end of the spline.
Vertex: Measures the markers position from a given vertex of any type. The vertex is selected using the Vertex Number spinner
Corner: Measures the markers position from a corner vertex, other vertices are ignored. The vertex is selected using the Vertex Number spinner
Bezier-Corner: Measures the markers position from a bezier-corner vertex, other vertices are ignored. The vertex is selected using the Vertex Number spinner
Smooth: Measures the markers position from a smooth vertex, other vertices are ignored. The vertex is selected using the Vertex Number spinner
Bezier: Measures the markers position from a bezier vertex, other vertices are ignored. The vertex is selected using the Vertex Number spinner
Free has no position in the spline, and they are not affected by Generator->Limit by ID/Padding. Usually, you add a unique free marker by sub-spline. Only the first one is used, others are ignored.
User Data Components
ID
An integer data field that can be used inside a RailClone graph with the Selector operator to choose geometry or in expressions.
To use ID mode with a selector operator, just change the mode to X or Y Spline Marker ID
To use ID in an expression use the XMarkerID and YMarkerID attributes.
User Data
Nine multipurpose data fields that can be used with expressions to control nearly any aspect of a graph. Each data field can be given a unique name.
To access the contents of a data field in an expression, use XMarkerData[n] and YMarkerData[n] where n represents a
value between 0 and 8 that determines which data field to access.
Data Set
A Data Set is pre-saved list of user data label names and unit types. Once created in the RailClone Style Editor, sets become available in this drop down list. You can change data sets at any time without affecting the values. Only the names and the unit types are affected. To learn more about creating Data Sets, see the reference below.
Copy data to new Markers
When this is selected, the data from the currently selected marker will be used on any new Markers that are created with the or buttons. This can save you a lot of time when you are reproducing markers that need to use the same data and ID values.
Banking Interface
Banking cannot be used with an A2S generator that uses free mode. If free mode is enabled then banking is disabled automatically.
Banking Components
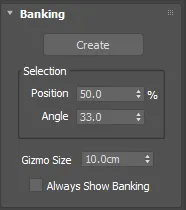
Create
Click this button to add new banking gizmos to the spline.
Selection > position
Allows the user to adjust the position of the selected banking gizmo on the spline. Can also be adjusted visually using Max's Move tool.
Selection > Angle
Allows the user to adjust the angle of the selected banking gizmo on the spline. Can also be adjusted visually using Max's Rotate tool.
Gizmo Size
Sets the size of the gizmo
Always show Banking
When enabled, the banking Gizmos are displayed even when its sub-object level is not selected.
Creating Data Sets
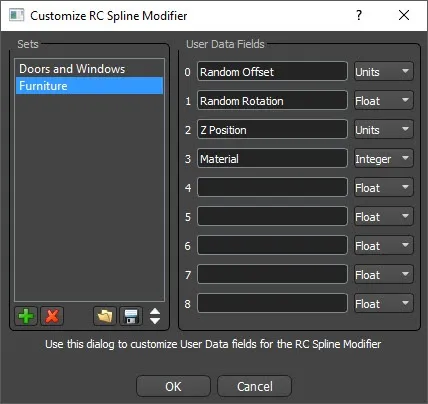
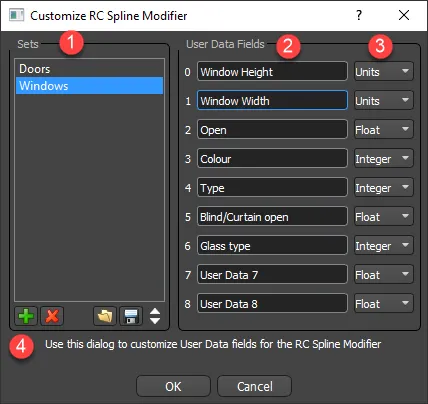
The RailClone Style editor contains a new editor that allows you to create data presets. To open it, go to the Base Objects menu and select Customize RailClone Spline Modifier.
-
Sets List Shows all the available data sets saved in the current RailClone Style. These will be available from the Data Set drop-down list in the RailClone Spline modifier
-
Data Fields Allows you to set preset names for the 9 data fields in an RailClone Spline modifier
-
Unit TypeAllows you to choose from Integer, Float and Scene units for representing data values in the RailClone Spline modifier.
-
Add/Delete/Open/Save
Adds a new data set
deletes the selected data set
opens a previously saved data set
saves the selected data set to file
moves the selected data set up/down