How to edit a RailClone style
The presets in the library can be easily modified and adapted to create your own styles. By adjusting the rule-sets and editing or even replacing the source geometry, the library presets are a springboard for creating your own styles and gaining a deeper understanding of how RailClone works.
Exercise: Using the Library to Learn RailClone
Reverse engineering presets is a great way to understand how to construct new rule-sets and create source geometry for RailClone. We strongly recommend you take some time to examining the node-trees for a selection of presets to demystify how they work.
For example, let's look at a deceptively complex looking preset from the Stadium library:
-
Start a new scene and draw a spline approximately 12m in length.
-
Create a new RailClone object, select and load the Architecture > Building Types > Stadium > Bleachers > Metallic Bleachers 3SR preset from the library () Lite users can select Metallic Bleachers.
-
The style uses fewer segments but many of the same principles will apply
") Metallic Bleachers 3SR (Pro only)
Metallic Bleachers 3SR (Pro only)") Metallic Bleachers 3 (Lite Users)
Metallic Bleachers 3 (Lite Users) -
From the Base Objects rollout, click on Spline and select the path created in step 1. You'll now see a bleacher as shown below.

-
At first glance this looks like a complex style. To look at how it works in detail, you can examine the rule-set. To do this, go the Style rollout and click
to open the Style Editor.
-
The style editor will open showing the style's node-tree. You can see that actually this rule-set is quite straightforward.
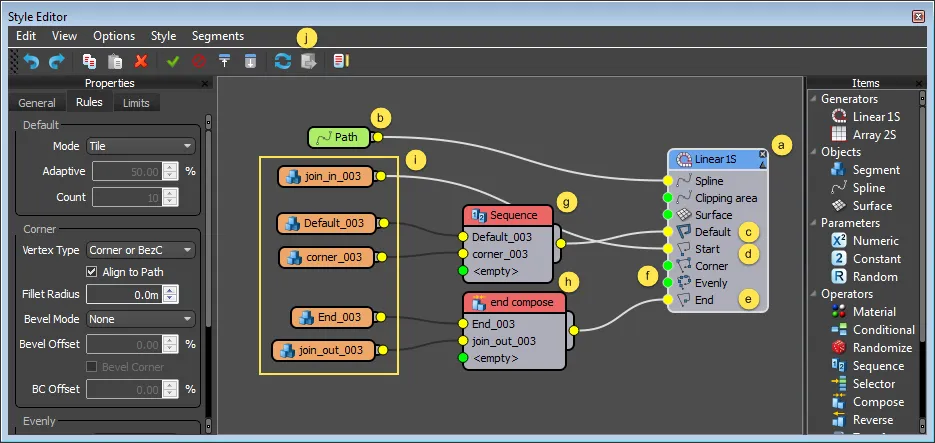
By examining this construction, we can learn a few things about this style and the way that RailClone uses these nodes to create a rule-set.
-
The preset uses a single Linear Generator This generator creates a one dimensional array using a length measurement or a spline as a path.
-
The preset uses a spline to determine the Path for the 1D Array. To use a spline you must wire a Path object to the generator's Spline input.
-
The preset has segments attached to the Default input. As the name suggests, this geometry is used by default unless the rule-set specifies that geometry from one of the other inputs should be used instead (as we'll see next).
-
The preset has a segment attached to the Start input. Geometry in the start input will be used once, at the beginning of the spline.
-
The preset has segments attached to the End input. Geometry in the end input will be used once, at the end of the spline.
-
The preset does not use the Corner or Evenly inputs. This preset is designed to work on straight or curved splines, not splines with hard turns.
-
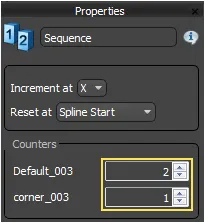
The preset uses a Sequence operator in the Default input. Operators allow you to manipulate segments, we'll discuss them in more detail in chapter 11. But by looking at the style you can deduce that the sequence operator used here is creating a repeating pattern in the array by repeating the segment in input 1 twice, followed by the segment in Input 2. To see how many times a segment is repeated by a sequence operator you click on the node and examine the Count values found in theProperties Editor.
-
The preset uses a Compose operator in the End input. Compose operators allow you to combine segments, this is useful for adding multiple segments to an input ordinarily designed for just one, such as Start, End, Corner or Evenly.
-
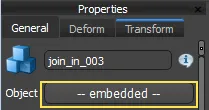
The style uses 5 Segments. Each segment node represents a piece of geometry added to and duplicated in the array. To fully understand how a rule-set builds an RailClone object, it's helpful to be able to see the pieces of geometry from which it is constructed. In library styles the geometry is no longer in the scene but stored inside the RailClone object itself. You can see this by clicking on a Segment node and going to the Properties, if the geometry is stored inside the RailClone object Embedded will be displayed in place of the object's name.
In the next sections we'll look at how to get that geometry back into the scene, so it can be examined, edited and replaced.
Exercise: Extracting Geometry
Once geometry is assigned to a Segment it is possible to delete the original object and , as we've seen, the RailClone object stores a copy of the mesh internally. However, to edit geometry and adapt styles it may be necessary to extract this object back into the scene. To extract the geometry of the Bleachers style follow these steps.
- In the Style editor, select one of the 5 Segment nodes.
- Click from the toolbar or go to Segments>Extract from the menu.
- The Segment's source object will be created in the scene at its original coordinates.
- Do the same for the remaining 4 segments.
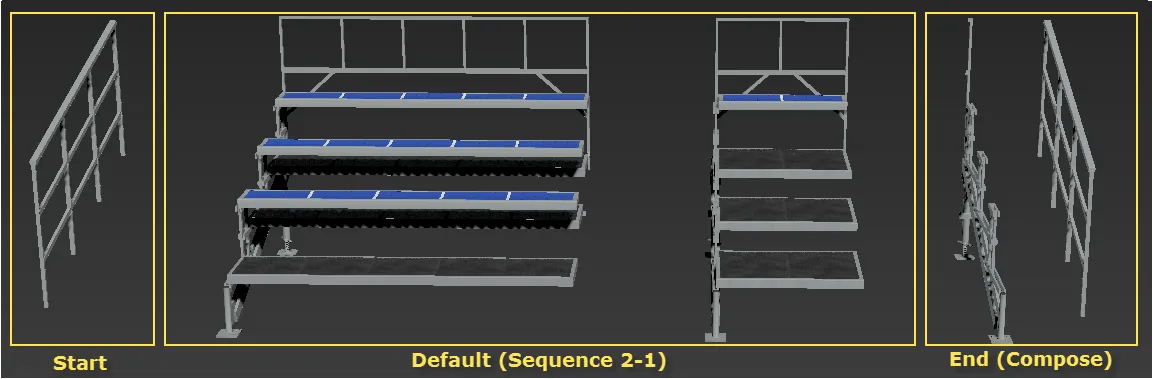
You can now see the 5 segments that make up the style. Understanding how the geometry and the rule-set works together is key to mastering the RailClone workflow. in this example you can see that a railing starts the array. The default part of the array, between the start and then end, is made using a Sequence operator to create a repeating pattern of seating and steps (note the supporting legs on the left hand side of both segments). To finish the array we repeat the railing used at the start but before that we need another set of legs, these two components are combined using a Compose operator.
Working with RailClone is a little like creating the pieces of a jigsaw and then providing detailed instructions on how they all fit back together. Let's try another example.
Exercise: Disable Nodes to deduce their Function
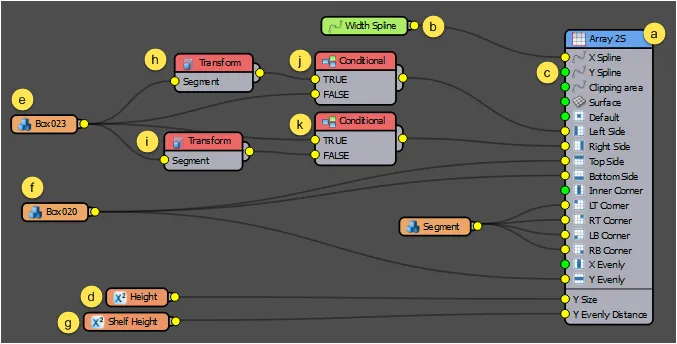
When analysing library styles, one of the most useful ways to work out what a node is contributing to the rule-set is to toggle it on and off by clicking the small cross in the top right hand corner. This will disable the function of that node and in most cases the first input will pass through. We'll use this tip to work out how to construct a balance shelving style by reverse engineering the preset.
 has been disabled. The transform node (b) passes through, ignoring the Conditional node as illustrated by the dotted arrow (c)") In this illustration the Conditional Node (a) has been disabled. The transform node (b) passes through, ignoring the Conditional node as illustrated by the dotted arrow (c)
In this illustration the Conditional Node (a) has been disabled. The transform node (b) passes through, ignoring the Conditional node as illustrated by the dotted arrow (c)
-
Start a new scene and draw a spline approximately 1m in length.
-
Create a new RailClone object, select and load the Entourage and Props > Shelving and Storage > Balance Shelving 1 preset from the library.
-
From the Base Objects rollout, click on Spline and select the path created in step 1. You'll now see shelving as shown below.
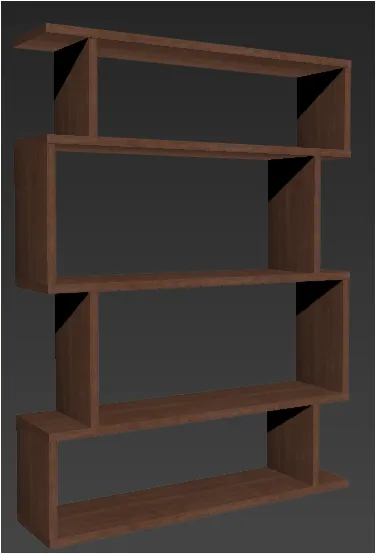
If you open the Parameters rollout you'll see two values you can edit to change the overall height, and the spacing between shelves.
-
Go the Style rollout and click to open the Style Editor and examine how this preset is made.
-
As in the previous example there are a few things you can learn just by examining the nodes:
-
The preset uses a single A2S Generator. This generator creates a two-dimensional array to create a shelf unit that has an adjustable height and width.
-
The preset uses a spline to determine the Path for the X axis of the array. To select a spline you must wire Path objects to the generator's Spline inputs.
-
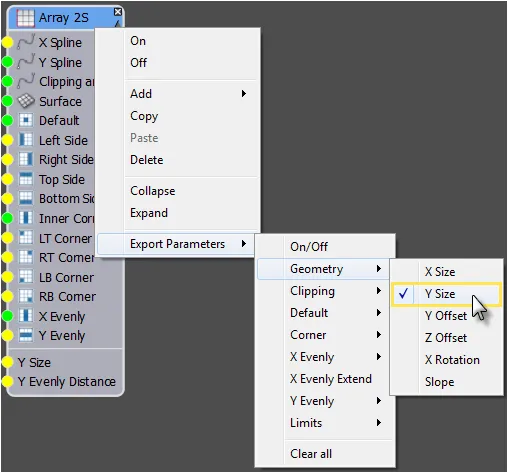
The preset does not use a spline to determine the path for the Y axis. This means that the height must be set using the generator's Y Size property. You can find this by going to the Properties Panel. Note that the value is displayed in red, this means that this property has been Exported.
-
The preset has an Exported Y Size property wired to a Numeric node. This allows you to adjust the distance between shelves from the Parameters rollout in the Modify panel. To export a parameter you right-click on the node and pick a property from the Export Parameters menu.
We'll explore this feature in more detail in Next Steps with RailClone: A guide for intermediate users. To work out what the remaining nodes do, try toggling them on and off to observe the results:.
-
Turning off the Segment node named Box 23 results in the sides of shelf disappearing. This is logical as the segment is attached to the Left and Right inputs.
-
Turning off the Segment node named Box020 results in all the horizontal elements disappearing. Again this is logical, this segment is wired to the Top, Bottom, and Y Evenly inputs.
-
The preset has an Exported Y Evenly property wired to a Numeric node. This allows you to change the shelf spacing from the Parameters rollout in the Modify panel.
-
Take a look at the two Transform operators. Turning off the topmost Transform operator straightens the left side of the shelf.
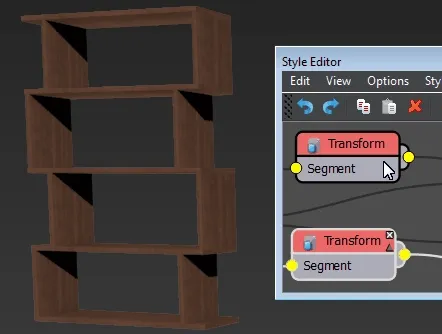 .
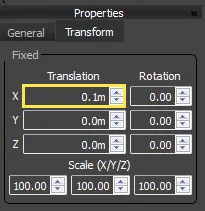
.You can therefore deduce that it is this operator is offsetting the segment. If you look at the Transform Operator's Properties > Transform > Fixed >Translation > X value, you can see that it is indeed being offset by 0.1m.
-
Turning off the bottom Transform operator straighten the right side.The transform operator is also offsetting the segment, but this time using a negative value.

-
The two transform operators are wired to Conditional nodes. If you look closely at the wiring you'll notice that the Segment node is wired directly to the True input of the first Conditional node and the False input of the second, the Transform nodes are wired to False input of the first Conditional node and the True input of the second. When you turn one of the Conditional nodes off, only the segment wired to the True input is used. To check out how the conditional operator works, open the properties panel and look for the activated check-box.
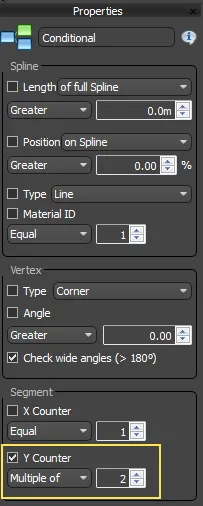
The Y Counter check box is ticked. By examining the settings, You can see that this node returns the Segment wired to the True input when the Segment counter for the Y Axis is a multiple of 2. This creates the alternating pattern on the sides of the shelf unit.
By systematically going through the nodes and toggling them on and off you can get a pretty good understanding of how this rule-set works. In this section you've only examined two presets, but if you're new to RailClone, it is often helpful to analyse something similar from the library before creating a new style.
Exercise: Editing Library Presets
Sometimes you want to use a preset from the library, but it isn't quite right for the project, fortunately styles loaded from the library are fully editable. It may be that you just need to adjust a few settings, or you could use a preset as the basis for a completely new style. The following section examines some of the elements of a preset that are most frequently and usefully edited to adapt the style.
Adjust commonly used Generator Parameters
Rotate
The parameter rotates the geometry around the X Spline.
To use it:
-
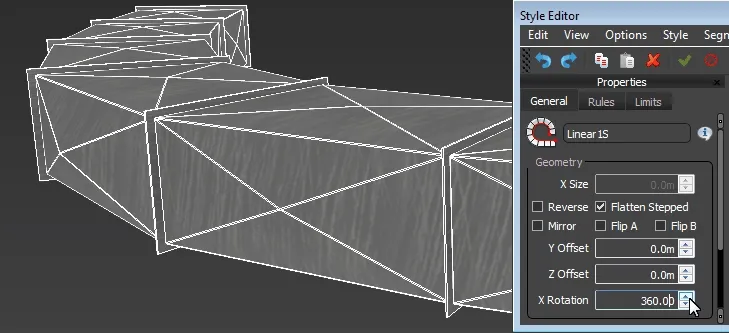
Create a new RailClone object, select and load the Industrial > Ducting > Rectangular Ducting preset from the library and add a spline as the Base Object.
-
Go the Style rollout and click to open the Style Editor.
-
Select the Generator and edit the Properties > Geometry > X Rotation value. Editing this value rotates the whole style around the spline.
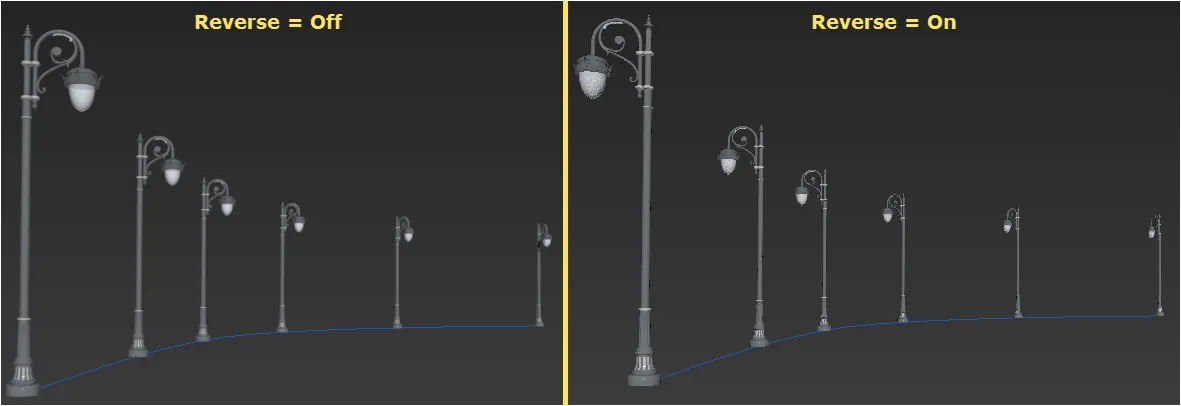
Reverse
This parameter reverses the direction of the path. This has the same effect as applying a "Reverse" command to an editable spline. To use it:
-
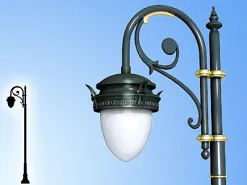
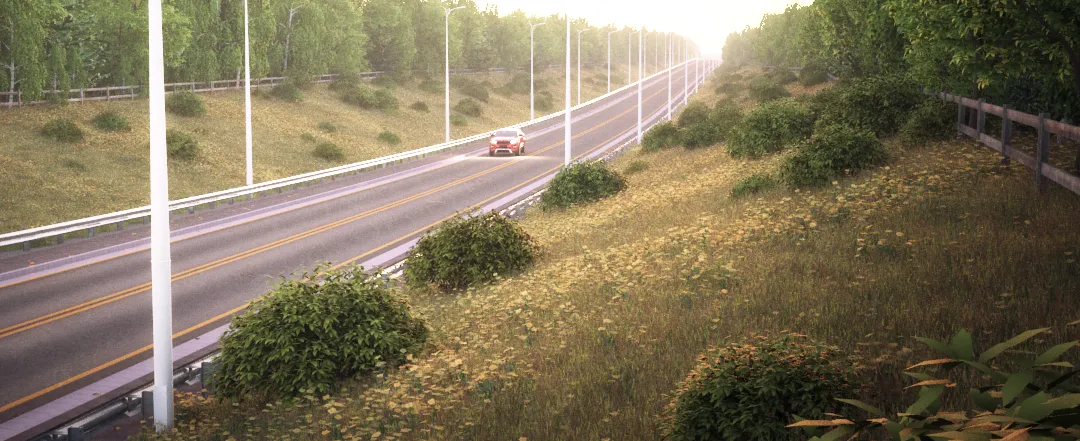
Create a new RailClone object, select and load the Civil Engineering > Street Lights > Street Light 3 Single preset from the library and add a spline as the Base Object.
-
Go the Style rollout and click to open the Style Editor.
-
Select the Generator and toggle the Reverse check-box. The lights will flip to face the other side of the spline.
Offset Y/Z
Y Offset applies an offset perpendicular to the path's direction, Z Offset Adjusts the position of the geometry on the RailClone Objects local Z axis. To use these settings:
-
Use the Street Light preset from the previous example and open the Generator's properties.
-
Edit the Y Offset value, the lights will offset perpendicular to the path.
-
Edit the Z Offset value, the lights will move up and down.
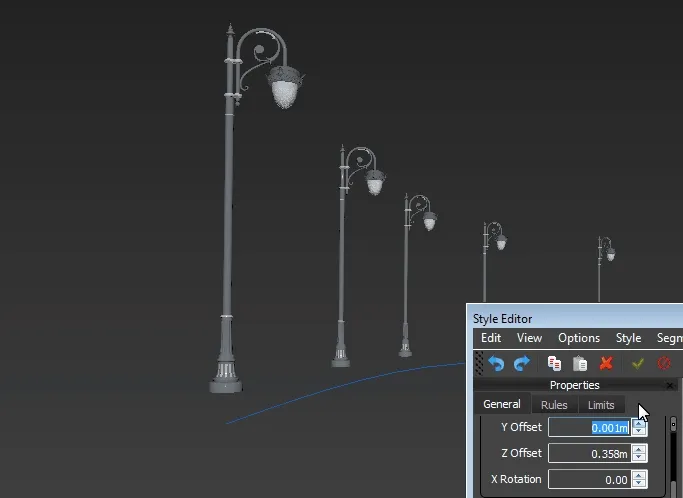
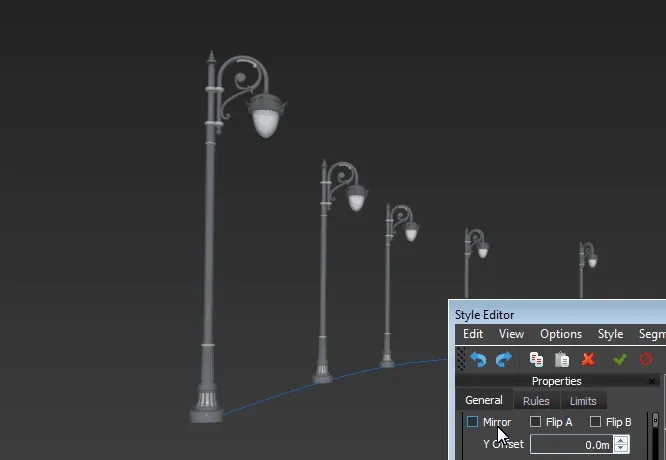
Mirror, Flip A, and Flip B
These parameters clone the RailClone geometry using the path as a mirror axis. This is particularly useful for presets such as sidewalks and street-lights where you might typically have a spline that defines the centre of the road, and you require these styles on both sides. The Flip options allow you to flip the geometry where A is the original array and B is the copy created with the Mirror feature.To use this feature:
-
Continue with the Street Light preset from the previous example and open the Generator's properties.
-
Click Mirror.
-
Increase the Y Offset value. you will now have two parallel arrays. At the moment all the lights are facing in the same direction.
-
Click Flip A to switch the lights on one side of the array so that both sets face towards one another.
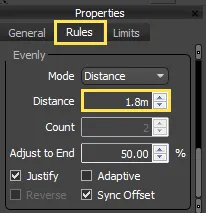
Evenly Distance
Evenly spaced segments are placed at regular intervals along the spline. In some presets, the distance value between evenly segments has been exported and can be adjusted from the Parameters rollout, for styles missing this parameter you can adjust the spacing by following the steps outlined in the following example.
-
Download and open exercise_curtain_wall_adapt.max. This file contains the objects needed for the next 3 exercises.
-
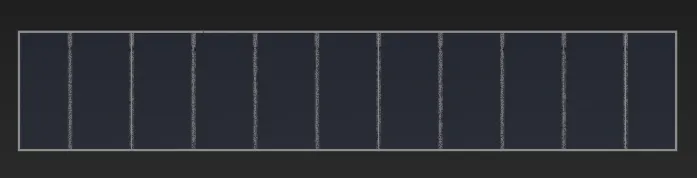
Create a new RailClone object, select and load the Architecture > Exterior > Facade > Curtain Wall > Curtain Wall Curve 01 preset from the library.
-
From the Base Objects rollout, click on Spline and select the spline called Line001 from the scene. You'll now see a facade as shown below.
-
Go the Style rollout and click to open the Style Editor.
-
Go to the Generator's Properties and switch to the Rules tab.
-
At the bottom of this tab you'll see the Evenly group, adjust the Distance parameter to control the spacing between Evenly Segments.
Extract and edit Geometry
RailClone segment's geometry is embedded in the object in a similar fashion to Max's compound objects. However, as we've seen, these can be extracted allowing you to easily adapt existing styles. In this example we will edit the height of the geometry used in the curtain wall style from the previous example.
-
Open the Style Editor and select the Segment node wired to the Generator's Default input. Click
To extract the segment.
-
Do the same for the remaining 3 Segments. You will now have these 5 mesh objects in the scene.

-
Let's imagine that In the current style the wall is not tall enough, and we need it to be larger. Once extracted, the geometry is instanced to the RailClone object, if you edit the extracted mesh the RailClone object will also update automatically.
-
Select all 5 extracted wall meshes and add an Edit Poly modifier. Select the vertices at the top of the mesh and use the move tool to increase the height. As you can see, the style updates live in the viewports. Once you're happy with the changes, the geometry can be safely deleted and RailClone will continue to retain an updated copy internally.
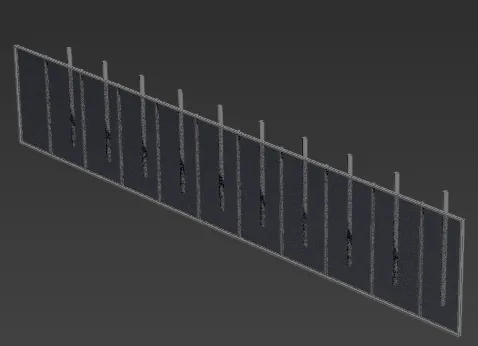
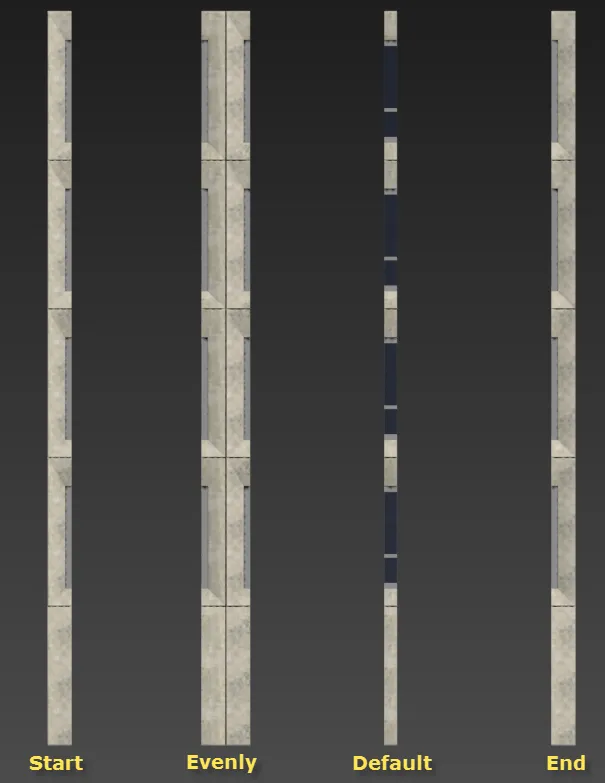
Swap Geometry
Once you understand how a style works you can use it as a template and add your own geometry. In this example we'll keep the same façade preset, but swap the geometry to create a completely different style. To do this we'll use the four meshes included in exercise_curtain_wall_adapt.max.
- Keep the style from the previous example and open the Style Editor.
- To swap geometry, select the Segment wired to the Default input, go to the Properties Panel and click the
Pick Object button (
 ), then
select the mesh in the scene called Default.
), then
select the mesh in the scene called Default. - Do the same for the other Segments. Select the segment wired to the Start input, go to the Properties Panel and click the Pick Object button , then select the object in the scene called Start.
- Select the segment wired to the End input, go to the Properties Panel, click the Pick Object button, and select the object in the scene called End.
- Finally, select the segment wired to the Evenly input, go to the Properties Panel, click the Pick Object button, and select the object in the scene called Evenly.
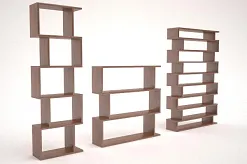
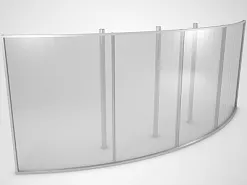
By following this procedure, what started as a stock preset will have changed from this...
... to this...

...just by swapping the geometry.
Starting with library styles either as a learning aid or as a template for new geometry is a powerful way to get started with RailClone. In the next chapter we'll dive into the L1S generator and create a new style from scratch.
Related Tutorials
![]()
In the first part of this tutorial we learn how to use some of the default library styles that are included with RailClone, looking at how they can be used out-of-the-box, or adapted to solve individual problems. In this tutorial you create the metal railings, concrete barriers and glass façades that run around the entire stadium
Using RailClone with Civil View
In this tutorial we explore how to apply presets from the RailClone library to Base Objects imported from Civil 3D. Many of the styles are edited using Mirror, X/Y Offset, and Flip A/B.
For more information please see the Customizing the Library, 1D arrays - Generator L1S, 2D arrays - Generator A2S, Segments and Exporting Parameters sections of the online documentation.