The RailClone interface
Before you start using the included library or modifying and creating your own styles, it's useful to take a few moments to get acquainted with the user interface. To explore the UI, first create a new RailClone object by following these steps:
-
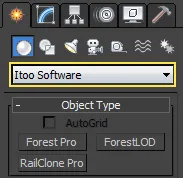
Go to 3ds Max's Command > Create > Geometry Panel and change the category to iToo Software.
-
Click RailClone Pro
-
Click and drag in the Top or Perspective viewport to create a new RailClone object.
-
Switch to the Modify Panel to access the tools required to load a library preset or create new style.
RailClone's 3 UI Components
The starting point when using RailClone is always the Modify panel. From here you can adjust many of the object's global settings, open the Library Browser to load and organise presets, and launch the Style Editor to modify existing styles and create new ones. Let's start by taking a look at the layout of the modify panel.
1 - Modify Panel
In addition to the About rollout, RailClone's Modify panel UI consists of 5 rollouts, shown below.
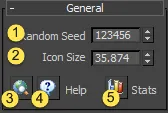
The General rollout
The General rollout is used to adjust global plug-in settings and provides access to statistics, help files, and updates.
- Random Seed sets the seed value used when generating random properties in a style.
- Icon Size Adjusts the size of the icon used when no geometry is displayed. This is purely cosmetic and has no influence on rendered geometry.
- Check for updates. Checks your plug-in is up-to-date.
- Help open the online documentation in your default browser.
- Stats thows useful information about the current style, including build time, number of segments and error messages.
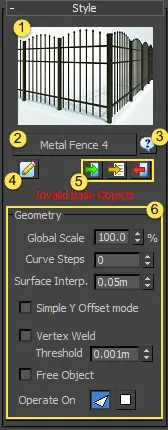
The Style rollout
The Style rollout is used to load, design and control rule-sets used by the RailClone object to build a parametric model. As well as being able to edit many attributes common to all styles, in this rollout you can load presets using the built in Library Browser, or create and edit Styles using the Style Editor.
- Preview Image displays a preview image when a style is loaded from the Library.
- Style Name click to open the Style Library. The button's text displays the name of the current style.
- Style Description click to read a description of the currently style, including a list of the parameters and base objects used.
- Style Editor click this button to open the Style Editor, used to create or modify styles.
- Copy Styles these 3 buttons are used to copy the current style to other RailClone objects or copy a style from inother RailClone object
- Geometry this group contains editable parameters that are common for all styles.
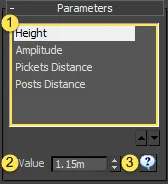
The Parameters rollout
The Parameters rollout lists editable values used by the current style. Unlike the parameters found in the Style rollout, these settings are added by the creator of the rule-set and vary from style to style. In order for a parameter to appear here, there must be an equivalent Numeric node present in the style editor.
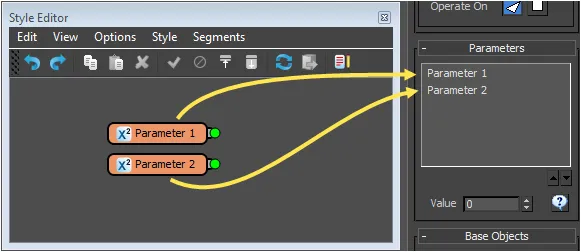
- Parameters List contains the editable parameters used by the current style. To select a parameter, click its name.
- Parameter Value used to edit the value of the selected parameter.
- Parameter Help click to display a user created description of the selected parameter.
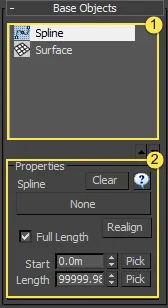
The Base Objects rollout
The Base Objects rollout lists inputs that can be selected from the scene used to generate the current style. For example, a single L1S generator may require a single spline to define the path, a single A2S generator takes two splines, one to define each axis; and both optionally can use a clipping spline and a surface. As with the parameters rollout, in order for a base object to be listed, there will be a corresponding node in the style editor.
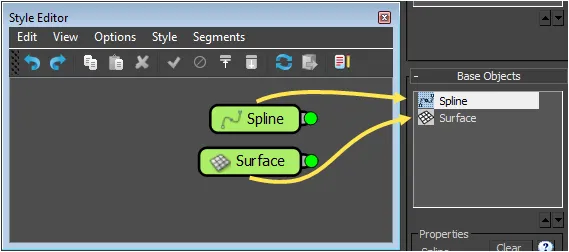
- Base Objects List contains all of the base objects used by the current style. Select a base object from this list to change its properties.
- Properties used to select splines and surfaces from the scene to be used as base objects. Includes parameters to limit the RailClone object within a set distance along a spline.
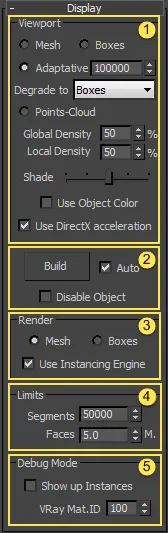
The Display rollout
The Display rollout contains options to control the way geometry is previewed in the viewports and generated at render-time.
- Viewport controls the way in which the RailClone object displays in the viewports. For dense meshes, either box proxies or a points-cloud should be used.
- Build click to rebuild the RailClone object. Only required if Auto is off.
- Render used to control the instancing engine.
- Limits used to set segment and face count thresholds to prevent crashes. If RailClone exceeds these values a warning is displayed and no geometry will be rendered.
- Debug Mode (V-Ray Only) used to help identify instanced segments. Useful for debugging complex styles.
2 - Library Browser
The Library Browser allows you to load presets that ship with RailClone and easily organise and load your own styles.
To open the Library browser, click in the Style rollout (see above). The library Browser's UI is divided into 5 parts:
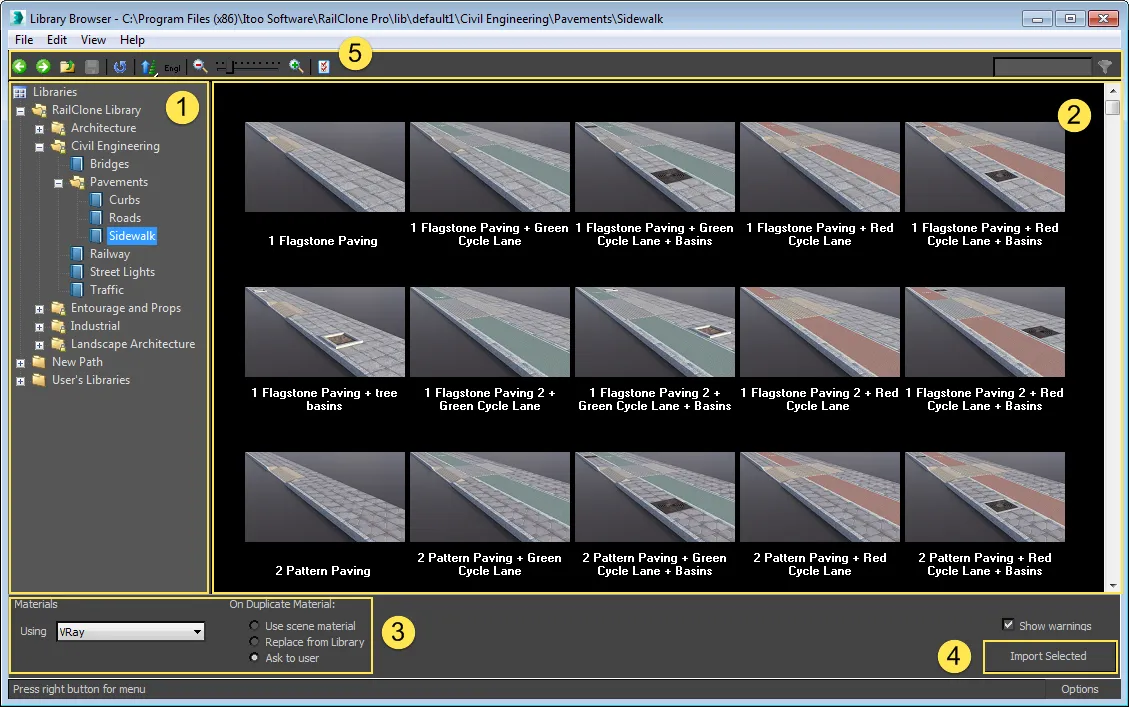
- Tree Navigator used to locate, edit and select libraries. To navigate, simply use the mouse or keyboard to expand folders and select libraries as you would in Windows Explorer.
- Items Grid thows the contents of the styles library selected from the Tree Navigator. To select a style, click on a thumbnail image.
- Options Bar used to select a material library. Can be left on Automatic to detect the current renderer, or you can manually select a material library.
- Import Selected click this button to load the selected preset.
- Toolbar provides access to a number of tools to help quickly navigate and modify the library.
3 - Style Editor
The style editor is at the heart of RailClone's workflow. This is the interface used to create the rulesets used to generate procedural geometry. To open the style editor, click on
from the Style rollout (see above).
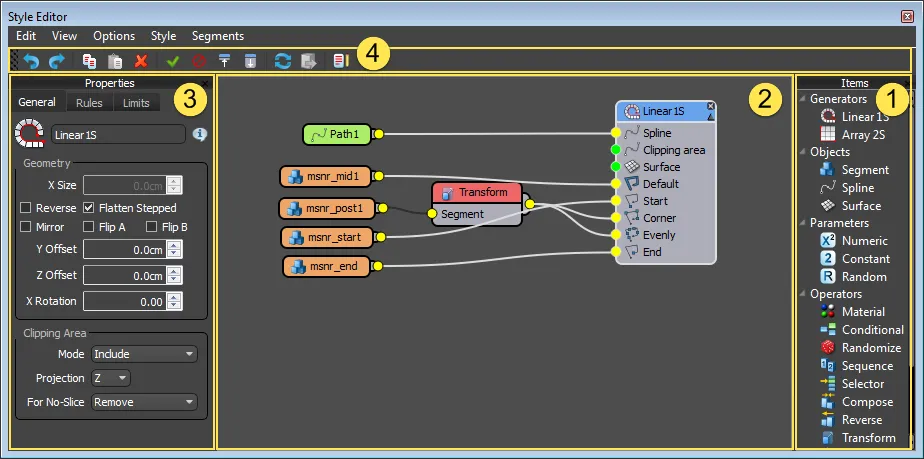
- Items List contains node types available for use when designing a new style. To add a new item, simply drag it from the Item List to the Construction View.
- Construction View used to create Style rule-sets by wiring together Generators, Segments, Operators, and Parameters. Once a node is created in the Construction View, its controls are accessible in the Properties Editor
- Properties Editor Allows you to view and edit the parameters of the selected node. The effects will be updated in real-time in the 3ds Max Viewport.
- Tool Bar provides buttons for regularly used functions.
Nodes
As you can see from the screenshot above, rule-sets are created by wiring together nodes, and though there are many different types, the interface for all of them is simple and consistent. The parts of a node are as follows:
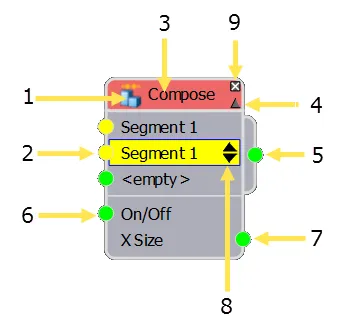
- Icon Indicates the type of node.
- Input Sockets Used for attaching another node as an input.
- Name By default this will be the labelled as the type of node, but it can be changed in the properties' editor.
- Collapse/Expand Used to hide or unhide the inputs and outputs. Useful to tidy up complex styles.
- Output Sockets Used to Wire a node to other operators or a generator
- Exported Parameter Exporting parameters allows you to control multiple nodes with a single input, and/or add a Numeric node to enable values to be edited from the modify panel.
- Exported Attribute Exporting attributes allows you to export the size of a segment's geometry.
- Change Order Up/Down Some nodes allow multiple inputs, when that's the case these arrows change the order in which the inputs are processed.
For more information please see the Style Editor . General, and Library Browser sections of the online documentation.