How to combine, select and sequence geometry
Once segments have been added to a style, operators allow you to apply all kinds of modifications. For example, you can use them to mirror a segment, combine multiple segments to create a new composite object, create patterns, randomise geometry or material IDs, and much more. In this introductory guide we will focus on operators that enable you to sequence, select, and combine segments, if you would like to see the full range of operators, including instruction for use, check out the full documentation .
Operators that select segments
Let's start by looking at two operators that allow you to select from a number of segments. The most literal version of this is the Selector operator. This allows you to choose from a list of segments using a numerical index. This index can be adjusted manually from inside operator's properties, or it can be wired to a numerical node to be edited from the modify panel without requiring you to open the style editor. The operator also has an alternate mode the derives the index number from the material ID assigned to a spline segment.
Secondly we'll look at the Randomise operator, this returns a random Segment from the list of inputs. Each segment has a presence value that determines the probability of it being selected.
To explore this and the next few operators let's create a brick wall style. The final geometry looks like this:
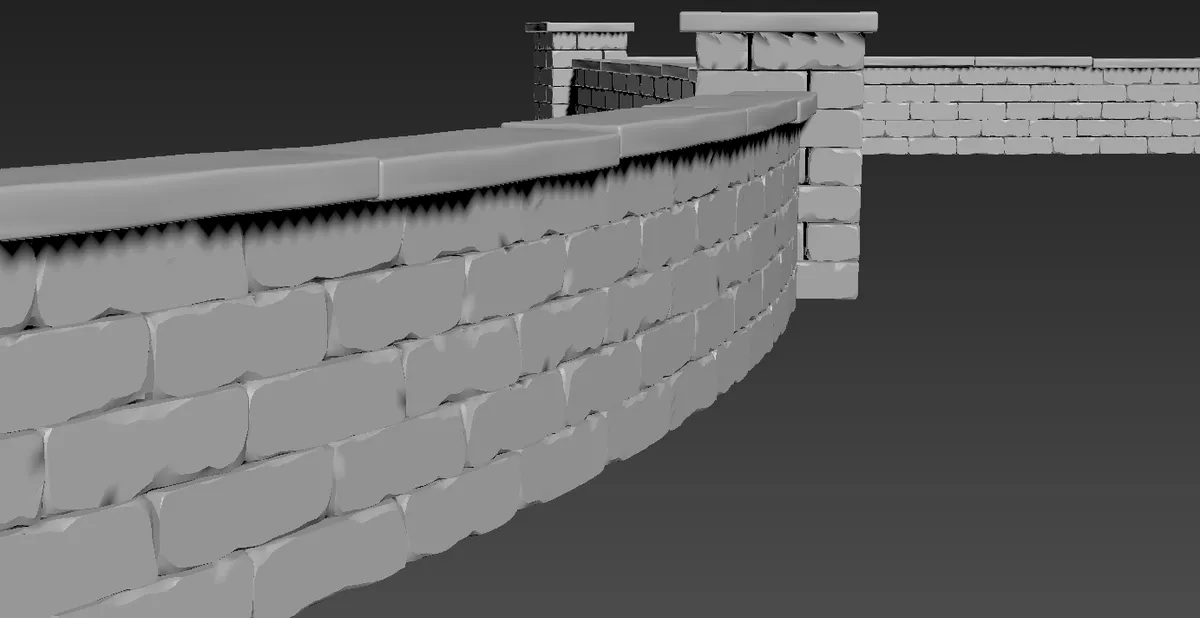
This style is constructed using these segments:

To get started, open the file name operators_1.max. To make things easier there's already a RailClone object in the scene and all the segments have been added for you. To ensure the pieces fit together correctly, padding values have been added to the Wall Default, Wall Start, and Wall Pier segments. If you need to review padding, please see Chapter 11. To add operators and create the rest of the style, follow these steps:
Exercise: Create and randomise the wall
-
Select the RailClone object called rc_wall.
-
Go to the Style rollout and click
to open the Style Editor. As well as all the segments you'll find two generators that share a spline. The top generator is used to create the main wall and the second generator adds the capping. As mentioned previously, it is often easier to break the style across multiple generators.
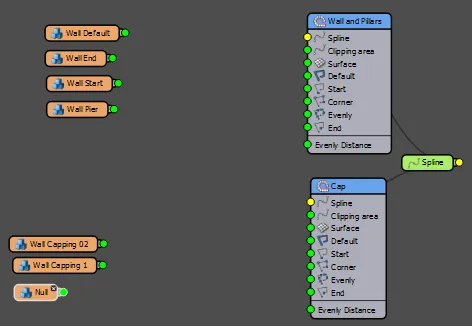
-
Let's start with the wall, create a new Randomise operator and wire it to the Wall and Pillars generator's default input. We'll use this to add some variation to the wall geometry.
-
Wire the segment named Wall Default to the Randomise operator's first input.
-
There isn't actually any additional geometry for the wall's default input, so we'll create variation by using mirrored clones of the existing brick segment. To do this, create a new Mirror operator by dragging from the Items list to the Construction View.
Mirror OperatorThis operator makes a mirror copy of a segment's geometry using any combination of the X,Y, or Z axes as a mirror plane.
-
Wire the Wall Default segment to the Mirror operator's input then wire the Mirror operator to the second input if the Randomise operator.
-
Click on the Mirror operator, go to the Properties Panel and change the Mirror plane from X to Y.
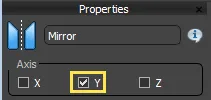
-
We can now Copy and Paste this operator to create 2 more variations. To do this, right-click on the node and select Copy then right click again and select Paste.
-
Select the new Mirror operator, Change the mirror plane from Y to Z and wire the output to the third input of the Randomise operator.
-
Copy and paste the Mirror operator a final time and change the axis to Y and Z. Wire this mirror node to fourth input of the Randomise operator. The node tree should look like this:
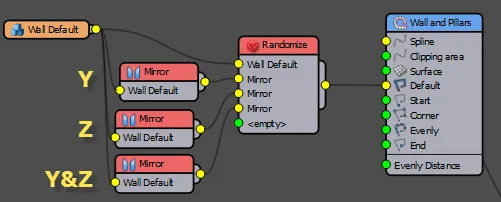
Exercise: Allow the user to select the cap type
In this section we'll use the Selector operator to create a style that gives the use the choice of two caps for the wall. Carry on from the previous exercise and follow these steps:
-
Drag a new Selector operator from the Items list to the Construction View.
-
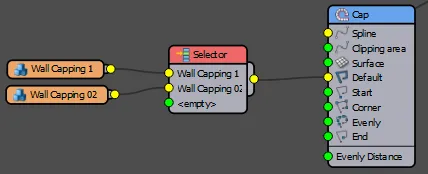
Wire the segment called Wall Capping 01 to the Selector operator's first input.
-
Wire the Segment called Wall Capping 02 to the Selector operator's second input.
-
Wire the Selector operator to the Cap generator's Default input. The node tree should look like this:
-
To switch between the cap types, click on the Selector node and go to the Properties Panel. From here you can change the Index to select from the two cap types.

-
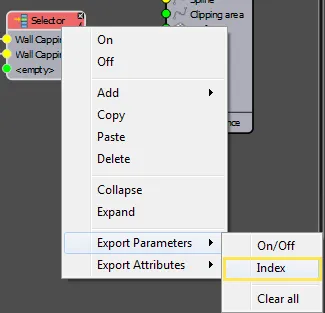
Though this works, it's not ideal to have to open the Style editor to change the Index value. To make it possible to change the value from the Modify panel, you can export the Index value and attach a Numeric node. To do this, Right-click on the Selector node and choose Export Parameters > Index
-
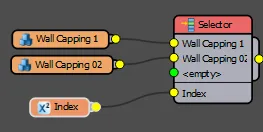
Create a new Numeric node from the Items List and wire it to the newly exported Index input in the Selector node.
-
Finally, click on the Index node and go to the Properties Panel. Turn on limits and enter a Minimum value of 1 and a Maximum value of 2. This is to ensure that you can only pick one of the 2 attached cap segments.
You now have a wall with randomised segments for the default section and a choice of two cap types. To finish the style we need to add the piers and the start and ends of the walls.
The Compose operator
The Compose operator enables you to build a new geometry object by attaching several segments together. When combined the segments are distributed side-by-side along the X Axis. At first sight, the Compose operator is functionally similar to the Sequence operator that we'll examine in the next section, but the Compose operator will enable you to wire multiple segments to an input that normally would only accept a single segment such as the Start, End Corner and Evenly inputs of the L1S array, or the Corners, Inner Corner, Sides and X Evenly inputs of the A2S array.
Exercise: Using the Compose operator
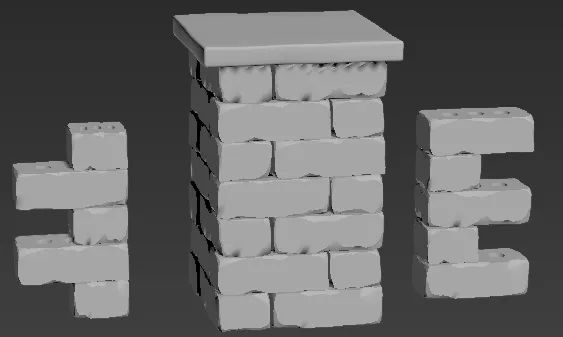
In our wall example the Compose operator will be used to combine a brick pier and the pieces required to terminate the walls. The image below illustrates these segments in the order they will need to appear for the Corner and Evenly inputs. For the start and end inputs only two of the 3 segments are required.
To add a brick pier at the Start:
- Create a new Compose operator by dragging it from the Items List to the Construction View.
- Wire the Wall Pier segment to the Compose operator's first input.
- Wire the Wall Start segment to the Compose Operator's second input. (Remember the segment values have already been added to ensure the segments dovetail together correctly)
- Wire the Compose operator to the Wall and Pillars generator's Start input.
To add a brick pier at the End:
- Create a second Compose operator by dragging it from the Items List to the Construction View.
- Wire the Wall End segment to the Compose operators first input.
- Wire the Wall Pier segment to the Compose operators second input. Note that this is the reverse order of the Compose used for the start input
- Wire this Compose operator to the Wall and Pillars generator's End input.
To add a pier at regular intervals and Corners:
- Create a third Compose operator by dragging it from the Items List to the Construction View.
- Wire the Wall End segment to the Compose operators first input.
- Wire the Wall Pier segment to the Compose operators second input.
- Wire the Wall Start segment to the Compose Operators third input.
- Wire this Compose operator to the Wall and Pillars generator's Evenly and Corner inputs. The finished node tree will look like this:
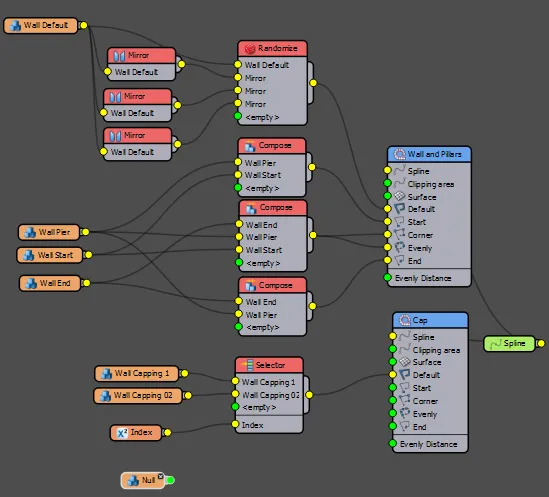
If you look at the caps now, you'll notice that they go through the brick pillars. This is because they run to the end of the spline, whereas the low brick wall is offset by the pillars. We can add an Empty segment with a fixed size to the Caps generator to compensate for the size of the pillars and push the capping sections away from the ends, corners and evenly segments in the style. In addition, in this section instead of entering the size of the pier manually, we'll export the X Size attribute of the Pier segment and use this value to automatically create the correct spacing. To do this:
An empty or null segment contains no geometry of its own but can be very useful for adding spaces to the array.
-
Wire the Null segment to the Cap generator's Start. End. Corner and Evenly inputs.
-
Right-click on the Null segment and select Export Parameters > Fixed Size > Fixed Size > X

-
Right-Click on the Wall Pier Segment and select Export Attributes > Size > X

-
Wire the Wall Pier segment's X Size output to the Null segment's X Fixed Size input.
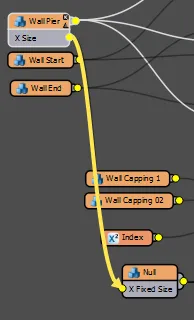
The final node tree looks like this ...
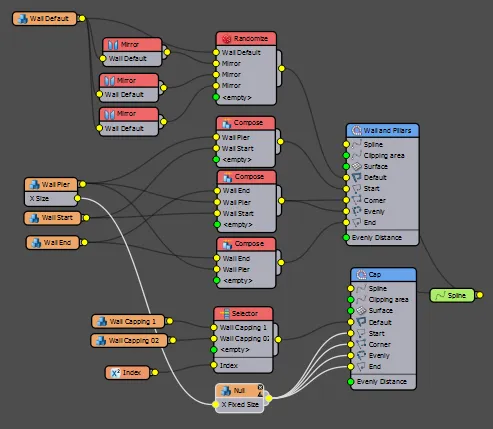
...which creates this style:

The Sequence operator
The Sequence operator creates patterns of segments by cycling through the list of inputs, starting at the top of the list and working downwards. Each segment can be repeated using a simple counter, when the counter reaches its limit, RailClone moves on to the next item in the list. When the sequence reaches the end of the list, it starts again from the beginning. Unlike the compose operator, a sequence can increment on either the X or Y axis and a sequence can be reset at either the start of each spline or the start of a new section.
In RailClone a section is defined as a length of path found between two segments of the Start, End, Corner, or Evenly type
To illustrate this operator we'll recreate the pattern found on a piano Keyboard. This style uses the six segments illustrated below. To save time these have already been added to a RailClone style and padding values have been added to ensure that the keys fit together correctly.
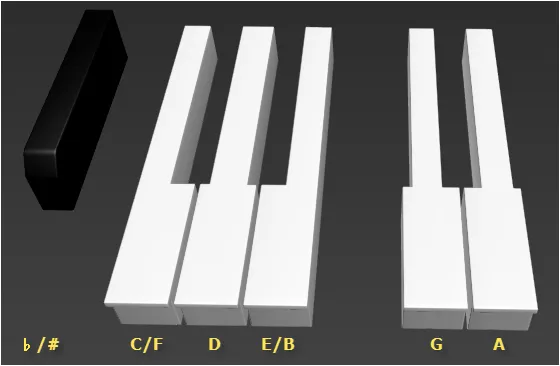
Exercise: Using the Sequence operator to create a piano keyboard
-
Open the file named sequence_piano_start.max and select the RailClone object from the scene called rc_piano.
-
Go to the Style rollout and click to open the Style Editor. As you can see the segments for all the keys have already been added to the style.
-
To create the pattern, add a new Sequence operator by dragging it from the Items list to the Construction View.
-
Wire the Sequence operator to the Generator's Default input.
-
Wire the key Segments to the Sequence operator in the following order (from the top-down): C/F, Flat/Sharp, D, Flat/Sharp, E/B, C/F, Flat/Sharp, G, Flat/Sharp, A, Flat/Sharp, E/B, The final node tree will look like this:
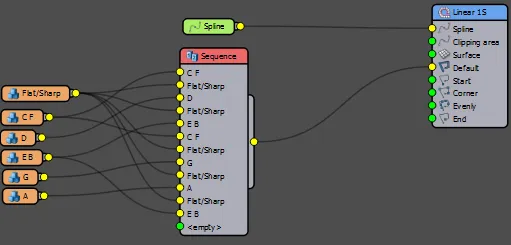
That's it! - This sequence operator creates the repeating 12 note pattern found on a piano. The sequence operator is ideal for creating regular and repeating patterns on the X or Y axis.

Related Tutorials

This tutorial explains how to use the Randomise operators to select from 11 book segments.
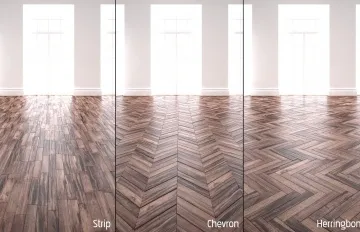
The chevron and herringbone patterns both use Compose operators to create their patterns. Follow these tutorials to see another way to use the Compose operator.

Part 5 of the Stadium tutorial uses Randomise and Mirror to create an audience with flags.

For a similar usage of the Compose operator as seen in the Brick wall example on this page, check out the balustrade example explained in the Seaside Promenade tutorial.
For more information please see the Operators and Exporting Parameters sections of the online documentation.