Display settings
Overview
The display menu contains options to control the way geometry appears in the viewports and how segments are generated at render time.
This rollout also contains the Proxy Cache settings.
Once you've finished working on a RailClone object you might not need to update it for a while, but if it's a complex graph, rebuilds can still slow down your file operations. To fix that there are several caching options that bake the geometry without losing any of the instancing power and advanced effects that you would if you converted it to an editable poly object or exploded it to native instances.
There are two modes. The first caches the RailClone object and saves the results directly into the scene. This will cut down on calculation times but will add to the size of the file. You can see the size in the Display rollout.
The second option saves the cache to an external file. Not only does that remove the calculation time, but it does so without adding to the size of the scene file. Perhaps even more usefully, this mode also allows you to load the same cache multiple times should you want to re-use the object in the scene. You can even create a cache and load it into a completely different scene, using RailClone as a simple asset loader.
Procedures
To display full resolution geometry in the viewports
Occasionally it is useful to display the full mesh in the viewports, this is most common when creating a new style where the final result needs to be easy to see without constant re-rendering, but also for some engines that don't support proxy displays.
If you are working on a small section of geometry for the purposes of creating or editing a style, adaptive display is often the best option. In this mode the full geometry is displayed unless the face-count exceeds the specified value. When this value is exceeded each segment is replaced by a simple box.
- Go to Display>Viewport and turn on Adaptive.
- Adjust the face count, remember that increasing the face count too much may slow down the viewports, depending on your system resources.
- Alternatively if you need full mesh display irrespective on face count, go to Display>Viewport and turn on Mesh.
To display previews of Shape operators in the viewports
Occasionally it is useful to display the splines used by generators in the viewports, especially when using the operators that may modify the spline's shape or position.
- Go to Display>Viewport and turn on Draw Splines.
- Ensure the splines you wish to preview are connected to an active generator. Only splines that generate geometry will be displayed.
To display geometry as a point cloud
 Balustrade using Points-cloud mode
Point Cloud mode is an efficient way of displaying a good representation of the geometry while maintaining excellent viewport performance.
- Go to Display>Viewport and turn on Points-Cloud. Adjust the Local Density percentage value to control the number of points for the selected RailClone object. It is also possible to control the relative density of all the RailClone objects in the scene using the Global Density value.
- Adjust the Shade slider to adjust the strength of the 3D shading effect. This is a global value and will affect all RailClone objects in the scene.
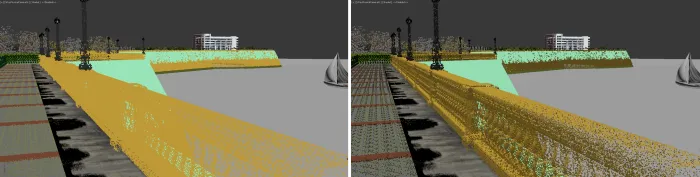
The image on the left shows the scene with no point-cloud shading, the right hand image shows the same scene with this feature turned on.
- Turn on Use Object Colour to tint the points using the colour set from 3DS Max's Object Color dialog. If unselected the points are coloured using the diffuse colour of the object's material.
To instance geometry in the viewports
Quick Mesh mode allows you to instance geometry in the viewports. The display can be similar to Mesh mode but with the added benefit of improved memory management and the ability to display significantly higher poly counts.
- Go to Display>Viewport and turn on Quick Mesh
In order for Quick Mesh mode to work, the active renderer must also support native instancing with RailClone.
Several features are not visible in the viewport such as the Material operator, UVW Segment Mapping modes, UVW XForm operator etc.
The more geometry that is actually instanced in your style, the more you will benefit from Quick Mesh mode. Geometry that is sliced, deformed or mirrored isn't instanced in Quick Mesh mode (or the render). To force instancing, you can disable Slice and Bend on a segment-by-segment basis from the node's settings.
To manually update RailClone objects
- Go to Display and turn off the Auto tick box.
- Every time you wish to update the RailClone object, press Build.
To enable/disable the Instancing Engine
When enabled, RailClone uses all the capabilities of the renderer to get the best results for complex scenes, automatically creating render instances and proxies according to the needs of the generated geometry. To enable/disable:
- Go to Display>Render and toggle on/off Use Instancing Engine.
- Be aware that some functionality is reduced when using these shaders, see the Rendering Best Practice section for more information.
To increase or decrease the maximum number of segments created by the Plugin
- Go to Display>Limits. Adjust the Segments value to increase or decrease the maximum number of segments created by the plugin
- Adjust the Faces value to increase or decrease the maximum triangle count created by the plugin.
To debug a RailClone object when using V-Ray
 Instanced segments are shown in blue color
- Go to Display>Debug Mode and turn on Show Up Instances. The default material ID is set to 100, leave this as it is or if you prefer, set to another number.
- Apply a multi-sub material that includes a material set to the ID specified in the previous step.
- All instanced geometry will be allocated the ID specified above and will render with the associated material
To create a Proxy Cache saved in the scene
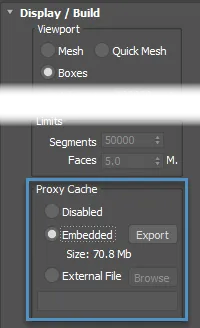
- Go to Display>Proxy Cache. Change the mode to Embedded
- Once the cache is created, the size will be displayed in the UI.
To create a Proxy Cache saved in an external file
- Go to Display>Proxy Cache. Change the mode to Embedded to generate the initial file
- Once the cache is created, the size will be displayed in the UI.
- Click on Export
- Choose a location for the file.
- Click save and the file will automatically be loaded and the mode changed to External.
- You can also load the cache into any RailClone object by Changing the mode to External File and loading a previously saved proxy cache file.
Interface
Viewport
Defines the mode how RailClone draws the object on viewport:
- Mesh. displays full resolution geometry in the viewports
- Boxes. displays a simple bounding box around each segment
- Adaptive. combination of the previous two modes. If the face count is below the value specified the full geometry is displayed. If the face count exceeds the value specified, bounding boxes are used.
- Points-Cloud. An ultra-fast display mode that provides a 3D preview of RailClone objects in the viewport.
- Global Density. Adjust the point density for all RailClone objects in the scene.
- Local Density. Adjusts to point density for only the selected RailClone object.
- Shade. This slider controls the strength of the 3D shading effect used on the points, move the shader to the left to reduce contrast and create a flat colour and to the right to increase the contrast.
- Use Color Object. Color by object or from the material applied to the object (specifically from the diffuse color slot).
The new point-cloud mode introduced in RailClone 7 and later offers significant improvements over the previous implementation
- The density of points is now fixed across all RailClone objects rather than being proportional to their distance from the camera.
- The GPU is updated only when a RailClone object is modified. The point-cloud remains cached most of the time to improve viewport performance.
- By default, each RailClone object is drawn using 250,000 points. This density can be adjusted using the Global Density and Local Density parameters.
Users can fine-tune additional parameters via the Windows registry (HKEY_CURRENT_USER\SOFTWARE\Itoo Software\RailClone Pro) for further customization.
- cloudPointsByObject (default: 250000) Sets the number of points used per RailClone object. Setting this value to 0 reverts to the classic point-cloud mode.
- cloudHitTestMaxPoints (default: 10000) Defines the maximum number of points used for hit-testing when selecting objects in the viewport. Reducing this value may improve hit-testing performance.
- Draw Spline allows users to visualize the results of spline operators directly in the viewport. This provides real-time feedback when working with spline modifications, making it easier to understand how spline-based operations are affecting the final geometry.
- Show RC Icon When enabled, the RC icon remains visible regardless of the state of the object, making it easier to
locate and manage instances in large scenes.
- Icon Name When enabled, the RailClone object's name is displayed as well as the icon.
Build
Set the update mode of RailClone to automatic or manual
- Auto. turns on/off auto update mode
- Build. if automatic mode is off, this button rebuilds the RailClone object.
- Disable Object. turns off the RailClone object so that it neither renders nor appears in the viewport.
Render
- Mesh Render segments as full geometry
- Boxes. Render segments as simple bounding boxes
- Use Instancing Engine. This parameter defines the behaviour of RailClone when it creates the elements for rendering. When enabled automatically creates instances and proxies when using V-Ray or Mental Ray. If disabled creates a single mesh containing all the
- geometry. See Best Rendering Practices for more information about this mode and how to use it efficiently in your scenes.
Proxy Cache
This feature allows you to bake a RailClone object into the scene or an external file. Baked objects load and render much faster because RailClone doesn't need to perform so many calculations to rebuild them. This is especially useful for complex styles.
A baked object cannot be modified or edited, if you want to make changes, just set Proxy mode back to 'Disable', make any changes, and then bake it again. Two modes are available
Embedded
Saves the cache to the scene increasing the scene files size but decreasing build times.
External
Saves the cache to an external .rcproxy file, decreasing build times without increasing the size of the scene file.
A few limitations apply:
- The viewport display is limited to Boxes or Quick Mesh depending on the mode that was active when the proxy was created. Note that this does not affect the render.
- 'Use Segment Material' and non-geometric objects are supported in Embedded mode only.
- Results may vary depending on the render engine that was active when the cache was baked. If you change the renderer, we suggest regenerating the Proxy.
Proxy Cache can be managed from Maxscript using the following command $.setProxyMode <mode> <externalFile>
For example:
- For Disabled, use
$.setProxyMode 0 "". It returns an empty string. - For Embedded, use
$.setProxyMode 1 "". It returns a proxy's size. - For External, use
$.setProxyMode 2 "proxyFileName.rcproxy". It creates and saves the proxy (overriding the file if it exists), and returns a description error in the event that is fails.
To use a Proxy Cache as a segment in another RailClone object you must disable Display > Use Instancing Engine before enabling the cache.
Limits
Limits the maximum number of segments or mesh's faces created by the plugin. When this limit is reached, the plugin shows a warning message.
Segments
The maximum number of segments that can be created by RailClone. Default value is 50,000. This value can be set to 0 to remove all limits.
Faces
The maximum number of faces that can be created by RailClone. Default value is 5 million. This value can be set to 0 to remove all limits
The size of the instances and proxies when "Use Geometry Shader" in on, is not taken into account when calculating the maximum number of faces.
Debug
Lets you identify visually on the render what pieces are created as instances. See Best Rendering Practices for more information about geometric shaders and instancing. Currenly the debug mode works only with VRay.
- Show Up Instances. then enabled, the Material ID of the instanced segments is changed to the specified value.
- V-Ray Mat ID. used to specify the material ID applied to instanced geometry.