Customizing the Library
Overview
RailClone includes an extensive library of presets, but often you will need to modify the built-in styles or create your own. Creating a new library is a quick and easy way to reuse and share Railclone objects in your projects. In this section you will learn the procedures to create your own libraries in RailClone. The library browser allows you to easily organise and edit your libraries and create new preset styles. In this section you will find instructions for common procedures and a reference guide to the interface.
All libraries are stored in disk as XML files and can also be edited with a text editor or XML editor.
Procedures
To Add and Modify Library Locations
RailClone can access styles from a number of different libraries. These are located automatically from a list of folder paths defined in the preferences. Folders can be stored locally or in a shared network location.
The RailClone libraries are divided into several types, the standard libraries included with the plugin and third-party packages and user generated Libraries. These are stored by default in "My Documents\RailClone."
the libraries included with RailClone cannot be modified. If you want to edit them, make a copy of the files to your own user folder. See below for a reference of the libraries' file structure.
To add locations follow these simple steps
-
With the library editor open go to File>Preferences… or click the preferences button from the top toolbar.
-
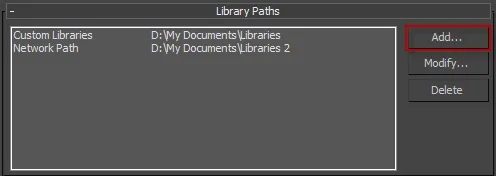
The Library Paths rollout shows a list of all the locations currently being used. To add a new location click on the Add… button and navigate to the folder for your libraries.
-
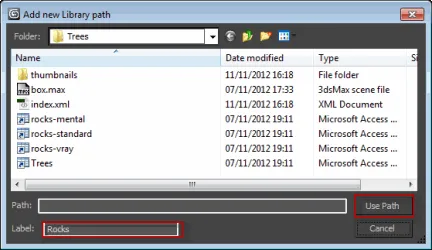
In the Label field enter a location name to display in the tree navigator.
-
Click Use Path to add the location to the library and return to the preferences.
-
Click OK and you should now see all the sub folders and libraries displayed in the tree navigator on the left hand side of library browser.
Alternatively to modify or update an existing location
-
With the library editor open go to File>Preferences… or click the preferences button from the top toolbar.
-
To modify a location select it from the library paths list and click Modify.
-
Navigate to the root folder of the new location and select Use Path.
To Organise and Create New Libraries
Each library location path (set from the preferences - see above) can be further organised into sub folders. RailClone will scan these subfolders and replicate the directory in the tree navigator found on the left hand side of the library browser window. From this panel folders and libraries can be created and deleted using the procedures outline below, and the directory structure easily reorganised using drag and drop.
To create a subfolder
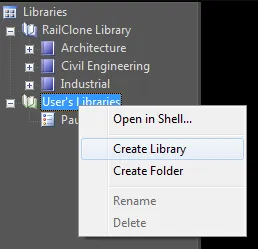
- With the Library Browser open, in the tree navigator on the left hand side, right-click on a user library and select Create Folder.
- A new folder has been created. The name will be highlighted, type in a new name for the folder.
Alternatively to create the subfolders directly in Windows Explorer
- Navigate to the library location in Windows Explorer or locate it automatically using the Library Browser by right-clicking its name from the tree navigator and selecting Open in Shell…. Create your directory structure in the usual way using Windows Explorer
- When you are done, update the view in the Library Browser to reflect the new directory tree by clicking on the Refresh button (from the top toolbar or select from the View menu.
To create a new library
When you create a library RailClone generates a new folder that includes an XML file and sub folders for thumbnails. This and any other sub folders found in the library location will not be displayed. This allows you to add additional directories for models, maps and materials used by the library without them cluttering up the tree navigator.
- In the tree navigator, right-click on the folder where you would like to save your new library and select Create Library. The library name will be highlighted, enter a title and press return
- If you need to rename your library at a later date, simply right click on it and select Rename.
To delete a library or folder
- To delete a folder or library, simply right click and select Delete.
To add a new object or preset to a library from the scene
It is possible to add selected RailClone objects from a scene directly to a library with just a few clicks.
To add a new RailClone object
- Select the RailClone objects you wish to add to the library
- Open the Library Browser using the button on the RailClone Toolbar
- Navigate to the library to which you wish to add the items
- Right-click in the items list and select Import Objects.
- A new dialog will open with a number of options. You won't need to change much here, and it's self-explanatory, but let's look at what each option does.
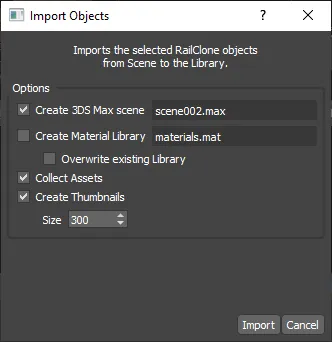
Create 3DS Max Scene Allows you to change the name of the Max file to store the new library objects. You can let ForestPack automatically name files for you, or you can specify them manually. The browser cannot add objects to an existing file, so a new max file we be created each time you run the process, and you'll be warned if you try to overwrite something
Create Material Library will save the materials assigned to the objects to a new material library. The materials in this library are assigned to the objects on import. we separate them in this way to allow users to have a different matlib for each renderer should they want it. If you choose a material library name that already exists, the new materials are appended to the existing file. This option allows you to overwrite the file instead.
Collect Assets moves all the external files referenced by the selected objects to a Maps folder in the library location. This will help to ensure that assets never go missing and can be found by Max.
Create Thumbnails Allows you to create and assign a thumbnail captured from the viewport for each object. 6. Click Import. Wait a few seconds and the items will be added to the library
To add a new Style to a Library from a file
Styles can be added to any library saved in a user location (represented in the tree navigator as a green folder). Styles are created from existing RailClone objects, stored in .max files located anywhere on your computer or network. However, sharing is simplified if the files and any material libraries and bitmaps use relative paths and are located in the library folder. If images with the same name as the object are placed in the thumbnails folder, these will be used automatically.
To add a new Style
-
From the navigator on the left, select a user's library.
-
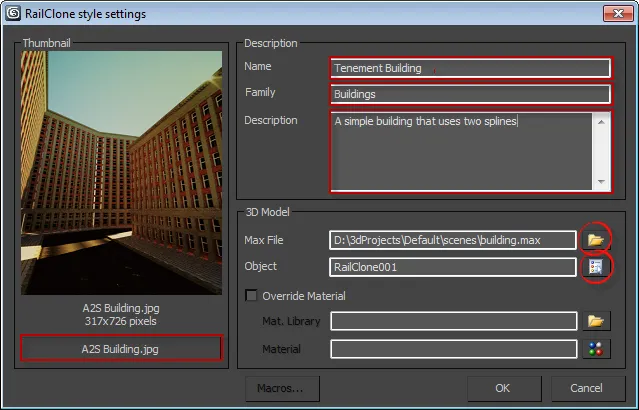
Right click in the browser and select Create Item>RailClone Object. A new blank Style will be created in the item browser. To edit, right-click on the item and select Properties…. Fill in the Name, Family and Description values. Note that the Name field is the text displayed by default in the library browser, other values can be left blank if not required
-
Click on the folder item next to the Max File field to select the .max scene file that contains the new Style.
-
A list will open containing the objects in the scene, pick the RailClone object you wish to add to the library.
-
If the object had a material applied this will be also be used in RailClone. It is also possible to override the material from an external material library. In order to do this enable the Override Material tick box.
-
Select the material library by clicking the folder icon next to the Mat. Library field. Find the library and click Open.
-
Next click the Select Material button, this brings up a list of the contents of the material library. Highlight the material to be used and click OK.
-
Add a thumbnail by clicking the image file button below the thumbnail preview window. Select an image file and click OK.
-
Click OK to accept the changes
-
Save the library by going to File>Save… or selecting the save library button from the top toolbar .
Adding a Macro to Assign a Material According to Renderer
When creating libraries it is possible to use macros to add variables to an item's property fields. This is very useful for creating flexible libraries that can dynamically respond to individual installations or changeable 3DS Max settings. One common usage is the creation of library items that automatically load appropriate materials based on the active renderer.
Prerequisites
-
Items are created in the usual way but materials are taken from a separate material library. In this example we assume three libraries, one for each of the three supported renderers: Mental Ray, V-Ray, and scanline.
-
Each material library's name should have two sections, one part that will be identical for all three files and a second part that matches the variable names assigned by RailClone's macro.
\[libraryName]\[macroValue].mat -
RailClone uses mental, vray, and standard as values for the renderer macro. The following three file names demonstrate appropriate file names.
MaterialLibraryName-mental.matMaterialLibraryName-vray.matMaterialLibraryName-standard.mat. The actual materials contained in each library should have identical names irrespective of the render. This allows you to dynamically switch between materials by automatically loading a different library for each renderer.
Auto-loading a material library by renderer
-
Either create a new object as described above, or right click and select Properties to edit an existing item.
-
Turn on Override Material this allows you to use a separate material library to texture the object. In this example it will automatically select a different material library according to the current renderer.
-
In the Max File field type the parts of your material library name that is common to all files. In the examples given above you would type
MaterialLibraryName-.mat -
Position the cursor where you want to add the renderer variable, in this case it would after
MaterialLibraryName-and before.mat. -
Click on Macros… and select
hdfreerendererfrom the subsequent list. Click OK to add the variable to the filename. The material filename should now readMaterialLibraryName-$(HDFREERENDERER).mat.
-
Select an appropriate material by clicking the select material button and picking one from the list. If the materials are identically named in each library, this macro will change the material depending on the currently selected renderer.
Interface
Library Browser Preferences
To access the Library Browsers preferences go to File>Preferences. or click the preferences button from the toolbar
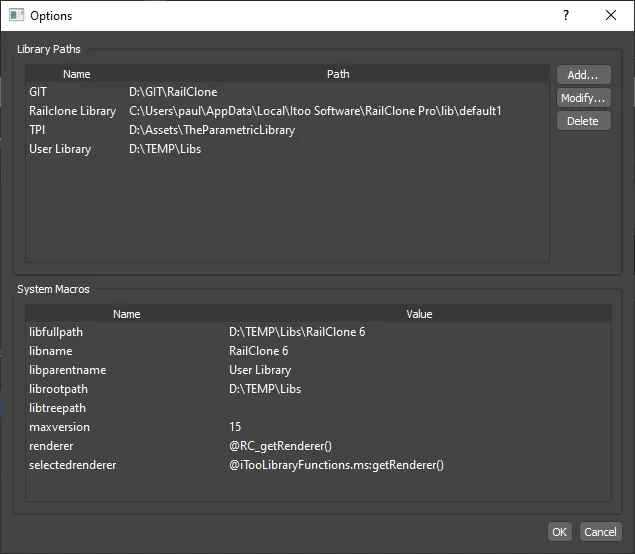
| Name | Description |
|---|---|
| Add... | Adds a new library location. |
| Modify... | Modifies the location of an existing library. |
| Delete | Deletes a library location. |
| Evaluate | Shows the correct values for all macros. |
Library Addition
Use the context menu accessible by right-clicking in the tree navigator to create new sub folders and libraries, and reorganise your directory using the mouse to drag and drop folders and libraries.
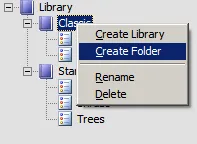
Commands available in the tree context menu:
| Name | Description |
|---|---|
| Create Library | Creates a folder and a new "index.xml" file. |
| Create Folder | Creates an empty folder on the disk, to organize folders or libraries. |
| Rename | Renames a Folder or Library, this command changes the name of the folder on the disk. |
| Delete | Deletes a Folder or Library with all its contents. Use with caution! |
Item Editing
To access the commands to edit a library's content, right click anywhere in the item grid. Note that changes are only stored in the system memory until the library is saved to disk.
Commands available in the item context menu :
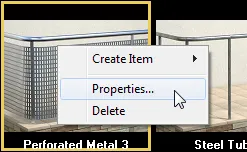
Commands available in the item context menu:
| Name | Description |
|---|---|
| Create Item | Creates a new empty item in the current library. |
| Properties | Shows the Item Settings dialog box. |
| Delete | Deletes the selected item. |
To commit your changes to disk, click the Save Changes button in the toolbar.
Style Properties
This window is used to set the properties for a library style. The RailClone plugin uses these settings to construct an object based on the properties of a reference object in a .max file.
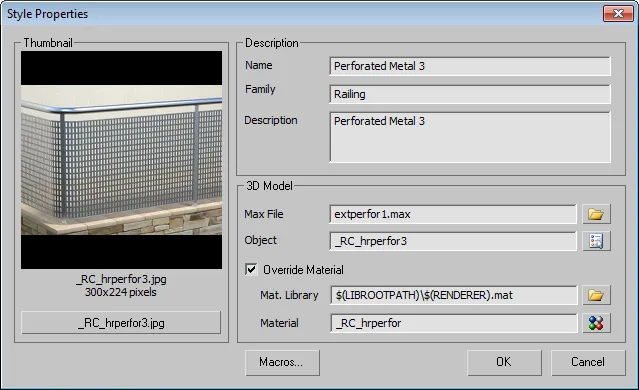
Settings available for Styles:
| Name | Description |
|---|---|
| Name | Style name. |
| Family | Family or catrgory. |
| Description | Textual description of the style. |
| Max File | 3DSMax scene where the reference object is stored. |
| Object | Name of the reference object. Choose one of the scene contents in the reference scene. |
| Override Material | Override the reference object material, and apply a supplied one. |
| Material Lib. | 3DSMax material library containing the material. |
| Material | Name of the override material, choose one from the selected library. |
| Thumbnail | Preview image of object. |
| Thumbnail Selector button | Press this button to change the thumbnail image. |
File Structure
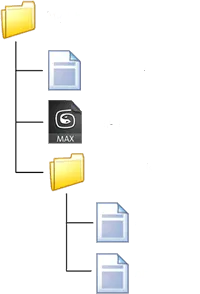
A library is a special folder on the disk which contains an index.xml file, where the items are listed. This file
points to the files necesary to define a library item. The browser stops to scan directories when an index.xml file is
found, so a library folder can't contain other libraries and all subfolders are hidden in the interface, this permits to
you to organize the data in several subfolders.
Each library item points to a single template object in a .max file or to a material in a .mat file. Each time you
select a library item, all settings in the template object are loaded and applied to the current RailClone object. You
can group several objects in a single file, or have separate files for each one. You can also use macro substituion (see
section below) to use conditions or complex structures.
Each library item also has an associated image file, typically stored in the thumbnails folder. This image is used to
show the image preview in the library, and you should have one image for each library item. If you name the files using
the same name of the object, the image is automatically selected in the editor.
Additionally, you can have materials libraries to override the object's default material. This way you can have several library items with the same geometric base, but with different materials and textures.
Macros
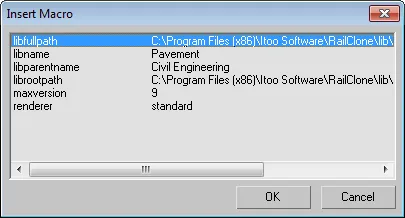
In some fields, such as filenames and object or material names, you can use macro sustituions to add more flexibility to
your library structures. These macros represent the library root location, current folder, or 3dsmax state values. The
macros are instanced using the $(NAME) format.
To open the Insert Macro window, press the Macros... button in the properties window, select a macro and click OK, the selected macro will be inserted in the current field of the property
Maxscript Interface to Load Item from Library
The following describes how to use the Maxscript interface to load an item from the library using the RailClone plugin.
Function Description
The loadLibraryItemByPath function allows you to load an item from the library using the item's route path within the
library. It is important to note that the item must be included in the Library Browser and that disk paths should not be
used.
Function Syntax
$.railclone.loadLibraryItemByPath [item path]
Parameters
<item path>
- The item's route path within the library. For example:
\RailClone Library\Architecture\Exterior\Railings\Vynil Handrail 1.
Return Value
The loadLibraryItemByPath function returns 0 if the style is loaded correctly, or 1 if an error occurs.
Retrieving the Path for a Loaded Item
To retrieve the path for a loaded item from Maxscript, use the following syntax:
$.style
This will return the path for the loaded item.
Example Usage
Here is an example of how to use the loadLibraryItemByPath function to load an item from the library:
$.railclone.

loadLibraryItemByPath

"\RailClone Library\Architecture\Exterior\Railings\Vynil Handrail 1"
This will load the item located at the specified path in the library.