Forest Tools
Overview
Forest Tools is a utility that allows you to convert a forest object to individual instanced geometry. This can be used when you need to share a file with someone who does not have the forest plugin, use a renderer that does not natively support ForestPack, or export the scene to another program.
Procedures
To add Forest Tools to the Utilities panel
-
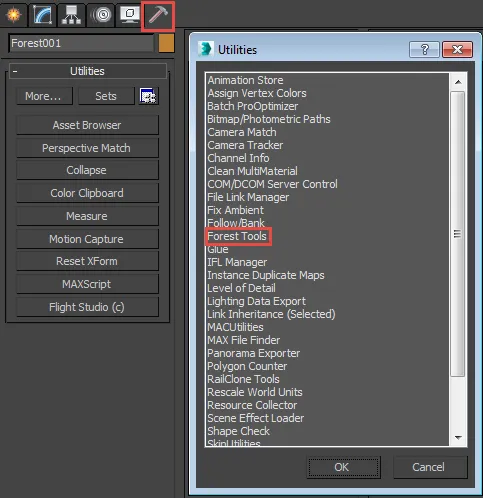
From the Command Panel click to open the Utilities Panel.
-
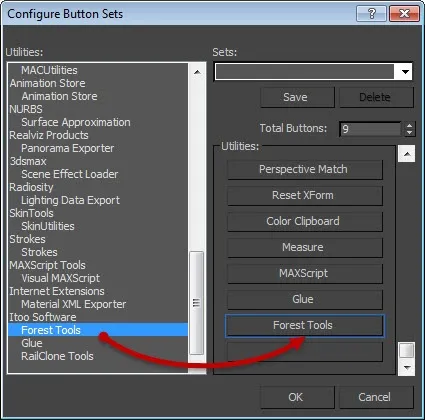
Click to open the Configure Button Sets menu.
-
From the Utilities list on the left, drag Itoo Software > Forest Tools to an empty button slot on the right. If necessary increase the number of buttons using the Total Buttons spinner.
-
Click OK.
To create instances from a ForestPack object
-
Select the Forest object to instantiate.
-
Open Forest Tools from the Utilities Panel.
-
In the objects group activate Move to layer and enter a name for the new layer.
infoIt is also possible to add instances to the current layer or add them to a new group, however creating a new layer is recommended for more efficient scene management.
-
Optionally select the Freeze checkbox to freeze the layer and select the Boxes checkbox speed up viewport performance by displaying instances as boxes.
-
Click Instantiate.
To delete existing instances
- Select a Forest Object that has previously been used to create instances.
- Open Forest Tools from the Utilities Panel.
- From the Objects group, click Delete.
To update instances
- Select the Forest object to update.
- Open Forest Tools from the Utilities Panel.
- If there are instances already in the scene that you need to replace, from the Objects group click on the "Auto delete old items" checkbox. This will delete any existing instances before creating new ones. Alternatively to remove them immediately click on Delete.
- If the forest object is disabled, click Enable and make the necessary changes. If the Forest object is disabled, and you do not need to enable it to make the changes, ensure that the Enable before start checkbox is selected.
- To automatically disable the Forest object after instances have been created, select the Disable at end checkbox.
- Click Instantiate.
To optimise materials for the active renderer
-
Open Forest Tools from the Utilities Panel.
-
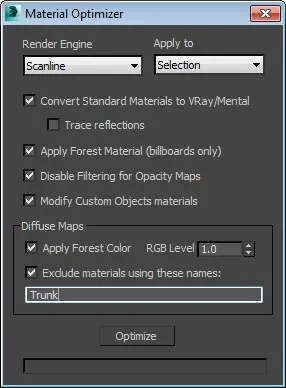
Click Optimize in the Material Optimizer section. The material optimizer tool will open.
-
From the Render Enginedrop down list, pick the current render engine (this should be automatic).
-
From the Apply todrop down list, select whether to run the optimizer on the current Selection or the Material Library.
-
For most situations the default settings are suitable. To exclude specific diffuse maps from being optimized, enter their names, separated by commas, in the Exclude materials using these names text box.
-
Click Optimize.
To export XML data
-
Select a ForestPack object
-
Go to the Command Panel > Utilities and click Forest Tools.
Click Export Data.

-
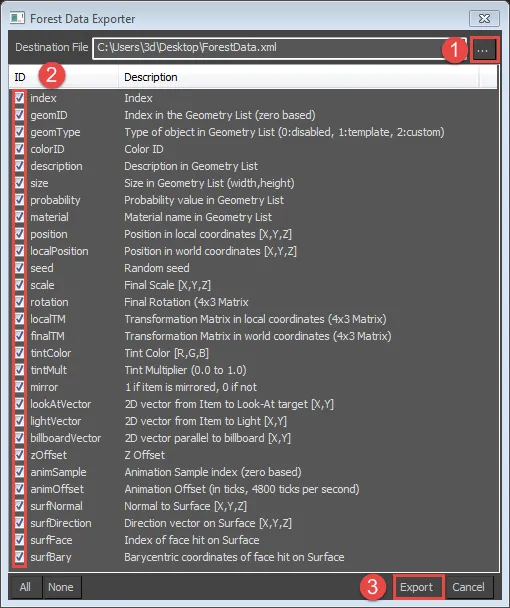
From the Forest Data Exporter utility set a save path by clicking
-
Enable the IDs of the channels you want to export.
-
Click Export.
Interface

Instantiate
Converts the geometry items of the selected Forest object to instances.
Objects
Individual objects
When enabled, creates instances as stand-alone objects.
Create group
When enabled, adds all instances to a new groups.
Move to layer
When enabled, creates a new layer and moves the instances to it. Use with the following options:
- Freeze. freezesthe new layar
- Boxes. displays new instances as boxes, useful for improving viewport performance with large numbers of instances or complex meshes.
Auto delete old items
When enabled, old instances are removed before creating new objects.
Delete
Removes instances manually. This only works if the instances and the Forest object, and they have not been renamed .
Geometry List
Disable at end
When the instances are created, we don't need anymore the trees created by the Forest object in the scene. To hide them, Forest Tools set the elements of the Geometry List to "Disabled". So, if you would like to recover the ForestPack mesh, set the Geometry back to "Custom Object". If this checkbox is disabled, Forest Tools doesn't modify the Geometry List.
Enable before start
Sets the Geometry to "Custom Mesh" automatically before creating the instanced objects.
Enable
Used to set the "Custom Mesh" mode in the Geometry List manually (of the selected Forest object).
3DS may be very slow handling a huge number of objects in a group, most of the time is better to put them as non-grouped objects in a separate layer.
Forest Exporter
Export Data. click this button to open the XML exporter tool. Using this menu you can export most of the internal options in a standardised format for use in advanced pipelines and to aid interoperability between software.
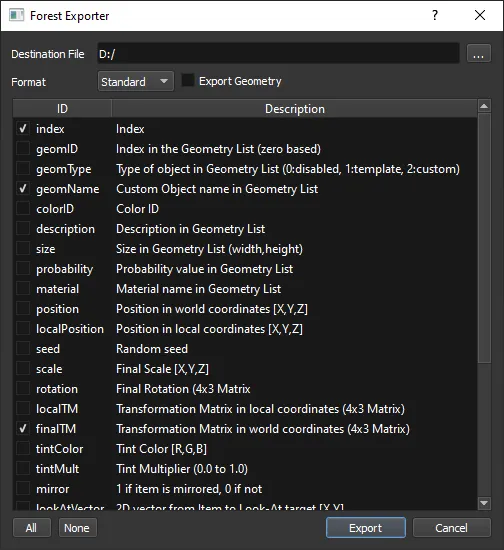
| Click to set the save path for the XML file. | |
 | Choose from a generic export with configurable settings, or a Unity export that prepares files for use with the ForestPack Unity plugin. |
 | Exports the source geometry to an FBX file. Used to import a scatter into other applications such as Unity |
| ID... | Enables the data channels to be exported. By default all are selected. |
| Click to select all IDs. | |
| Click to deselect all IDs. | |
| Click to save the XML data to disk. | |
| Click to close the XML export utility. |
To export all the Forest objects in a scene to an XML file using maxscript, you use the following command:
Forest_pro.ForestPack.exportData "file" "list of fields separated by spaces"
For example:
Forest_pro.ForestPack.exportData "c:\\tmp\\data.xml" "geomID colorID size"
Material Optimizer
Runs the Material Optimizer for the selected Forest objects. See Materials for more information about this tool.