Exporting to Unreal
Unreal Engine's Datasmith tools support exporting ForestPack and RailClone objects to Unreal with no need to Instantiate using Forest Tools. To use these features you need to install a Datasmith plugin for 3ds Max that's compatible with the Unreal Engine version that you are using.
To export a full ForestPack or RailClone object to Unreal
-
Select the Forest or RailClone object(s) you wish to export. Go to File > Export > Export Selected.
-
Choose a file name and change the filetype to Datasmith.
-
In the Datasmith Export options. Make sure that Include is set to Selection.
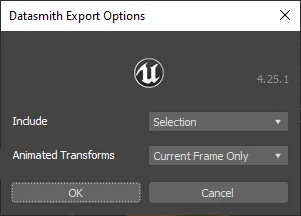
-
Click Export. And wait a while. Depending on the number of instances and sources geometry this can take anything from a few seconds to a few minutes.
-
Once that's done, switch over to Unreal and click the Datasmith button

-
Select the file you just exported from 3ds Max and click Open.
-
Choose the folder in which you wish to save the Forest Objects. Create a new one if necessary, then click OK.
-
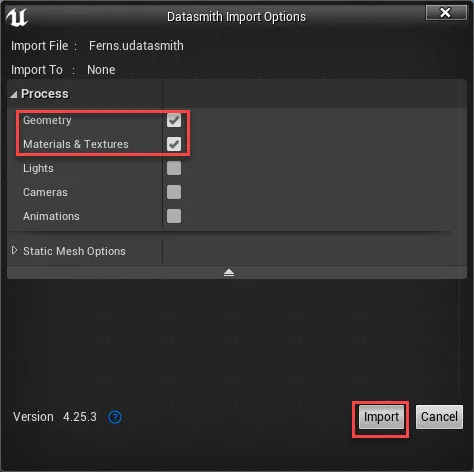
Next, the import options will open. Change the settings as desired and then click Import

-
Datasmith creates a single Actor in the Unreal Engine Level, named according to the name of the object in 3ds Max.
Each Forest or RailClone object is reconstructed in Unreal as a Hierarchical Static Mesh. This is a very efficient way of creating thousands of instances in real-time. It also creates a Static Mesh asset for each unique piece of geometry. In ForestPack this will match the number of source models, in RailClone it depends on whether segments are sliced or bent whether they are instance or not and therefore exported as unique items.
If you click on a Hierarchical Static Mesh actor, you will see that it contains one Hierarchical Static Mesh component for each asset as well a list of all the individual instances. From here you can swap the geometry if you like simply by selecting another Static Mesh from the content browser and clicking the Use Selected Assets button.
To export only Bounding Boxes
-
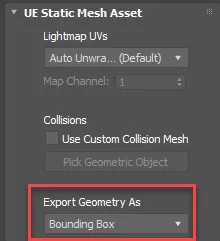
Locate and select the source geometry used by the Forest objects you wish to export. With a Forest Object selected, you can do this easily by right-clicking and selecting the Select Forest Custom Objects option.
-
Add a Datasmith Attributes Modifier no each one. Change the Export Geometry As option to Bounding Box. When this is active, a simple box is exported in place of the original geometry, allowing you to swap it for something much more optimised in Unreal.
-
Go to File > Export > Export Selected.
-
Choose a file name and change the filetype to Datasmith.
-
In the Datasmith Export options. Make sure that Include is set to Selection.

-
Click Export. And wait a while. Depending on the number of instances and sources geometry this can take anything from a few seconds to a few minutes.
-
Once that's done, switch over to Unreal and click the Datasmith button
-
Select the file you just exported from 3ds Max and click Open.
-
Choose the folder in which you wish to save the Forest Objects. Create a new one if necessary, then click OK.
-
Next, the import options will open. Change the settings as desired and then click Import.
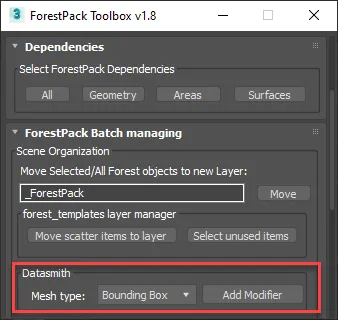
Locating source objects and adding Datasmith modifiers can be a somewhat tedious task if you have a lot of Forest Objects in the scene. So we have written a script to automate the process. It's a part of the ForestToolbox, an ever-evolving set of handy functions that registered users can download from our forum . To use this:
-
Select one or more Forest Objects.
-
In the Datasmith section, change the mode to Bounding Box and click Add Modifier.
Swapping Source Objects in Unreal
This procedure is useful for ForestPack when you want to substitute scattered items with more real-time friendly assets. It may also be used for RailClone, but note that RailClone objects may only partially be instanced depending on your slicing and deformation settings.
Once a scatter has been imported into Unreal, it's possible to swap the source geometry. You might want to do this if you've just imported bounding boxes, or if you've imported meshes that are not well optimised for realtime and you want to replace them with something more performant. There are two ways depending on how many items there are in a scatter.
For scatters in the early thousands or less
-
Select the Hierarchical Static Mesh actor and in the Details panel select the Hierarchical Static Mesh component for the object you wish to replace.
-
Select an object you wish to substitute from the Content Browser. Click the Use Selected Asset in Content Browser button to assign the new object to the Hierarchical Static Mesh component. All instances will be updated.

For scatter greater than a few thousand objects
The Hierarchical Static Mesh Component lists all the instances in the UI. Because of this, scatters that contain too many objects can cause slow-down or freezing as the UI attempts to list all the items. To swap items like this, you can use a different approach that doesn't involve you needing to open the UI for the component. Here's how:
-
In the Content Browser find the folder containing the placeholder assets used in the scatter.
-
Open a second Content Browser and locate the object you'd like to substitute
-
Drag the new plant into the same folder as the placeholder. Makes sure you choose Copy. This is so that you don't accidentally end up deleting items from the content browser that you might need later.

-
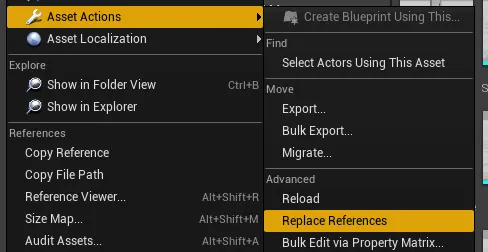
Now select the new object and the placeholder object.
-
Right Click and select Asset Actions > Replace References
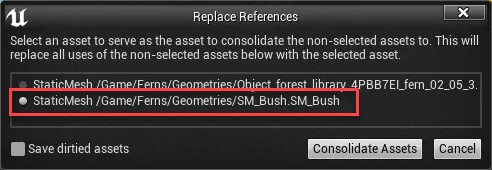
-
A dialog opens. From the list you need to select the asset you wish to keep. The unselected assets will be removed and the references swapped to the selected asset.
-
Click Consolidate Assets.
-
The scatter will update in the scene.
-
Using this technique you can easily swap any geometry imported from ForestPack.