Effects Syntax
From version 5.0 onwards you can use effects to control many of ForestPacks parameters using mathematical expressions. Effects are easy to use as long as you have some basic scripting and mathematics knowledge and use the syntax rules as described below.
Syntax reference
Effects expressions use a straightforward mathematical syntax comprising operators ., +, -, *, /, etc.
mathematical Functions that take one or more arguments and return a result, ForestPack's built in variables (which
we have called Attributes for clarity), user declarable Variables, and customisable Parameters that are
editable from the Effects rollout panel.
There are many built-in functions, and attributes already available and these are all documented in the Command List on the left hand side of the Effects Editor. To see an explanation for each entry, single click on it and a description and example syntax will display in the Help pane at the bottom of the interface. General syntax rules are describe below.
Functions
Functions provide pre-built commands that can be used to perform common mathematical expressions. To use a function you use the name followed by any required arguments enclosed in parentheses. For example, to convert 90 degrees to radians you use the degToRad function as follows:
degToRad(90);
Where a function requires multiple arguments, these should be separated using commas. For example to generate a random integer between 0 and 350 you would use the randomInt function as shown below:
randomInt(0,359);
Functions can also be nested by including them as arguments, for example:
degToRad(randomInt(0,359));
You can find a full list of supported functions, including information about the arguments they require here .
Attributes
Attributes are ForestPack's pre-defined variables. Dot syntax is used to access an attribute's values. This means that when using an attribute, the statement must always start with a reference to some object, followed by a full stop (. or dot) and then the name of the property you wish to access. Each dot represents a move from more general access to the object to more specific levels of parameter detail. For example fpItem refers to the entirety of the Forest object, whereas "fpItem.position" accesses the local coordinates of each scattered item. Continuing down the hierarchy, fpItem.position.z refers only to the items position on the Z axis. Dot syntax is also used to access the position coordinates of Object parameters and the components of vector variables.
To assign a value to an attribute you use equals (=). For example to set the Z rotation of all scattered objects to 45 degrees you would enter the following:
fpItem.rotation.z = degToRad(45);
Be aware that not all attributes in the Command List can be edited using expressions, but they can all be read. Studying the list of editable attributes is a useful first step in seeing what's possible with effects because these represent the aspects of ForestPack that can be scripted with this tool. A full list of attributes divided into editable and uneditable categories can be found here .
Variables
In addition to built-in attributes, variables can be created and edited in the expression script. They are declared as one of three types, either real for float values or scene units, int for whole numbers, or vectors. They are not case-sensitive but there are a few restrictions on naming:
- Cannot be the same as an existing attribute, function, variable or parameter.
- Must only consist of alphanumeric symbols and underscores (
_). - Cannot start with a number.
- Cannot contain spaces.
- Variables are local to the Forest Object, this means you can use the same variable name in different objects without problems.
Below are examples that illustrate how to create each of the three types of variable as well as illustrating some acceptable ways to construct variable names based on the rules outlined above.
int objectCount = 1
real object_rotate_z = 10.5
vector objectPosition1 = [10,10,0]
You can also create variables without assigning a value as follows:
int objectCount
real object_rotate_z
vector objectPosition1
Once a variable has been declared, you assign a new value using equals (=). For example
objectCount = 5;
object_rotate_z = 22.5;
objectPosition1 =[20,20,20];
Variable types cannot be changed once created and though you can assign an integer value to a real variable, you can't assign a real value to an integer. In this case you will need to use the rounding functions ceil(), floor(), trunc(), or round() to convert the real value to an integer, for example:
int integer;
real float = 12.3;
integer = floor(float);
print integer;
If you evaluate this code then 12 will display in the output window. This is because the floor function rounds 12.3 to the lowest adjacent whole number which can then be assigned to the integer variable with no errors.
Parameters
Parameters are a special type of variable whose values are assigned in the Effects rollout, this enables a user to control effects without needing to understand the code. Instead of being declared in the script like a normal variable, they are created in the parameters tab of the effects editor.
There are 5 types available which you create by clicking on the corresponding button:
Numeric Parameters. Adds a numeric spinner to the effects' rollout. Number format can be set to real, integer, percentage (real), or scene units (real).
Object Parameters. Adds an object picker to the effects rollout and allows you to access the selected object's position vector.
Controller Parameters. Allow you to access the output from any controller in 3ds Max, picked from the effects' rollout.
Texture Parameters. Allow you to use the RGB values from a map, picked from the effects' rollout.
Curve Parameters. Allow you to use a curve to control values. The curve can be edited from the effects' rollout.
Use the properties section to fine tune the parameter including the type of number, minimum and maximum limits, a default value and the name. Irrespective of the type, you reference a parameter in the expression using its name and because of this, parameters have the same naming restrictions as regular variables as described above.
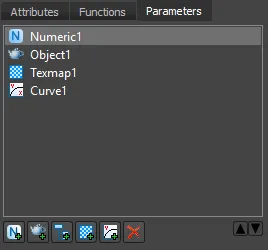
To illustrate here's how you would assign parameters with names as shown in the screen capture above to a new variable:
int Variable1 = numericParameter;if the type is set to integerreal Variable2 = numericParameter;if the type is set to real, percentage or scene unitsvector Variable3 = objectParameter.position;to assign an attribute (in this case position, which is a vector)real Variable4 = objectParameter.position.z;to assign just one component of an object's position (in this case z)real Variable5 = controllerParameter;if the controller outputs a float numbervector Variable7 = controllerParameter;to assign a vector controllervector Variable8 = controllerParameter.z;to assign just one component of a vector controller (in this case z)
A parameter's values cannot be edited in the expression, only by changing the value of the spinner in the effects rollout or by editing the object or controller to which it is linked.
To read more about parameters and how to create and edit them, please see the parameters page.
Instruction separation
Each command must be terminated by a semicolon ( ; )
Comments
Comments are added by starting the line with a # symbol. Anything after the # on the same line will be ignored:
# This is a comment
# This is another comment
Note that comment lines do not need to be terminated with a semicolon, though it won't affect anything if you do so.
Debugging
To help debug effects we have provided a print command that displays the results of an expression or contents of a variable, parameter or attribute to the Output window. For example
real exampleVariable = 5.0;
print exampleVariable;
will print 5.0 to the output window.
Because you are often creating scripts designed to manipulate the values on thousands of scattered items it is not possible, or desirable, to see the results for every instance. Therefore, the print command displays values for only the first scattered object
Case Sensitivity
Functions, variables, properties and attributes are not case-sensitive, for example "fpItem.position", "FPITEM.POSITION", "fpitem.position", and fp.ITEM.position all refer to the same attribute.
Getting Started - A simple example
To illustrate the syntax described above it is useful to go through the steps necessary to create a new effect. In this example, there'll add the ability to specify a step increment when using the existing Transform > Rotation > Z property. To do this:
-
Create a new ForestPack object and assign to a simple Spline area.
-
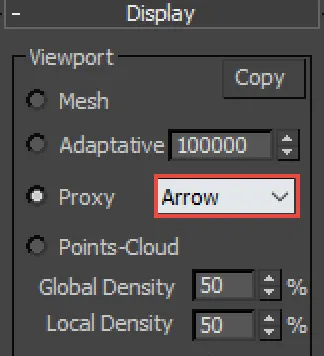
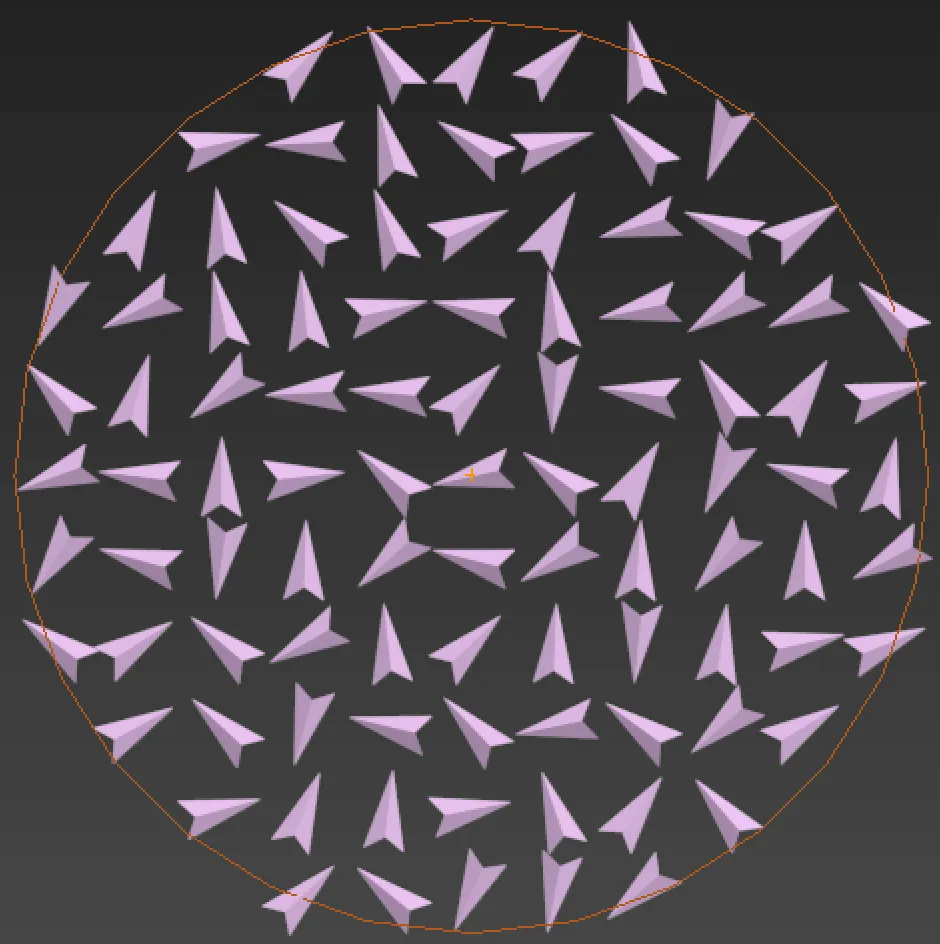
As this script will control the Z Rotation, we can change the display mode to arrows to clearly see the effects. To do this, go to the Display rollout and change the Viewport mode to Proxy > Arrow.
-
Go to the Transform rollout and turn on Rotation. Set the Z Minimum value to 0 and the Z Maximum value to 270.
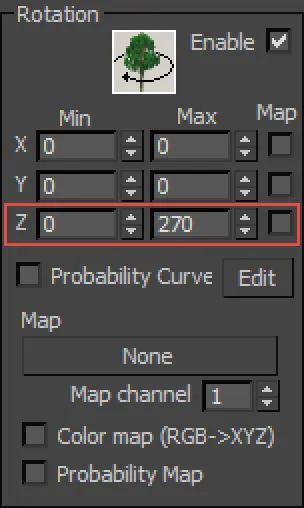
At this point the Forest object will randomise the rotation within the range specified by these two values.
We want to control it so that it randomises within this range, but only in increments of a specified value.
-
Go to the Effects rollout and click to open the Effects Editor.
-
Comments First let's add a comment to the effects so that anyone looking at the code knows what it does. Comments are added by starting the line with a # symbol. On line 1 write the following:
# Stepped Random Z RotationBecause of the #, this line will be ignored when the interpreter parses the script.
-
Variables Next we'll create a new Variable called
rotateRangeand assign to it the range specified by the Transform > Rotation > Z Minimum and Maximum values that we entered in step 2 above. To create a variable you must first specify the type of variable followed by the name. Numbers in the effects editor can one of three types: real (real), integers (int) or vectors (vector). In our example we want to create a Real variable calledrotateRangeso under the existing comment enter:real rotateRange =We want to assign the existing rotation randomisation range specified in the Transform rollout to
rotateRange. To do this you need to use an Attribute. These are ForestPack's predefined variables, and a full list can be found in the Attributes tab on the left side of the Effects Editor.
To find the range, we need to subtract the Transform > Rotation > Z Minimum value from the Maximum. to do this find
randRotMaxin the attributes list and double-click on it. This will add the Attribute at the current cursor location.real rotateRange = fpItem.randRotMaxYou'll notice that the full text reads
fpItem.randRotMaxthis is because randRotMax is an attribute of the fpItem object. Effects use dot syntax to access the properties or methods related to an object, for example in this case we only want to access the Z rotation property of the randRotMax vector, so we add a z to the end of fpItem.randRotMax to give us:real rotateRange = fpItem.randRotMax.zTo deduct the minimum value, add a subtract sign and use the randRotMin attribute. It isn't necessary to use the Attributes list to add text; if you prefer too, and you're familiar with the commands, you can enter script manually. Type
fpItem.randRotMin.zto that the line now reads:real rotateRange = fpItem.randRotMax.z - fpItem.randRotMin.zFinally, to separate instructions, every line (except comments) must be terminated with a semicolon
;. So the final line will read:real rotateRange = fpItem.randRotMax.z - fpItem.randRotMin.z; -
Parameters are variables whose values are assigned and edited from the Effects rollout. These can either be numerical value, the position of another object in the scene, or the output from another object's controller. In this example we need a step value parameter that can be easily accessed by the user.
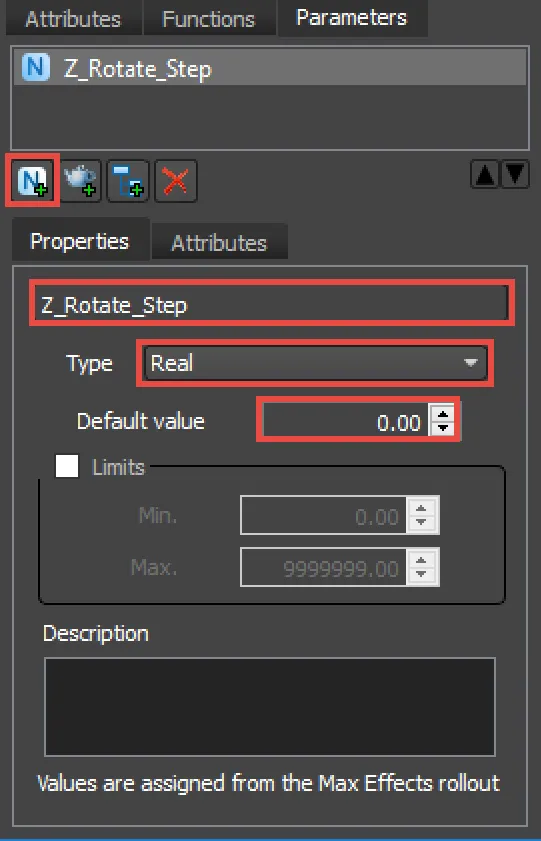
To add a new parameter you use the Parameters tab on the left of the Effects Editor. Click on the
button to add new numeric Parameter. You can then enter a name for the parameter, this will display in the Effects rollout and is also the variable name that you will use in the script to access the parameter's value. In this example we will name the parameter
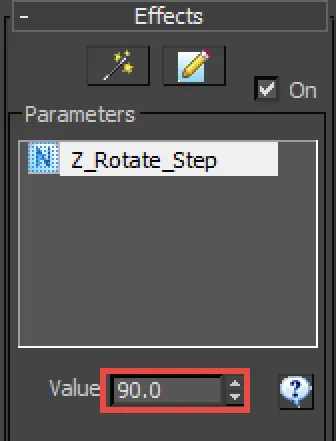
Z_Rotate_Step(note that spaces are not allowed). You should also set the type of variable from the drop-down list, options are Integer, Real, Scene Units, and Percentage - in this case we need a Real number.In the Effects rollout you will now see the Z_Rotate_Step parameter. Select it and enter a value of 90 degrees for testing purposes. Of course any value can be used but this will make it very clear when the effect we are creating is working.
In the next step we will use this parameter to compute to maximum number of random values that can be generated by a given step size within the rotation range. This value is then assigned to a new variable called
stepsInRange. For example with a range of 270 degrees and a step size of 90, there are 4 possible rotation angles if you include zero: 0, 90, 180, and 270. 8. To calculate this value, at the end of the script and on a new line enter the following code:real stepsInRange = rotateRange/Z_Rotate_Step;This divides the variable we created in step 6 by the Parameter created in the previous step.
To see the value of
stepsInRange, you can use the Print function:print stepsInRange;Click evaluate and with the current settings the output window will display 3 (because 90 divides into 270 three times). However, if we change the Random > Z Rotate > Max value to 300 degrees and evaluate again we get 3.33333. For this equation to work we need to know the number of times
Z_Rotate_Stepdivides intorotateRangeand return the results as a whole number "." to do this we can use a function to round a fractional number down to the nearest whole value. 9. Functions is with attributes, functions can be added by double-clicking on them from the functions list or by entering them manually. If you select a function you will find help at the bottom of the effects editor that describes its application, lists the arguments and lets you know the type of number it returns.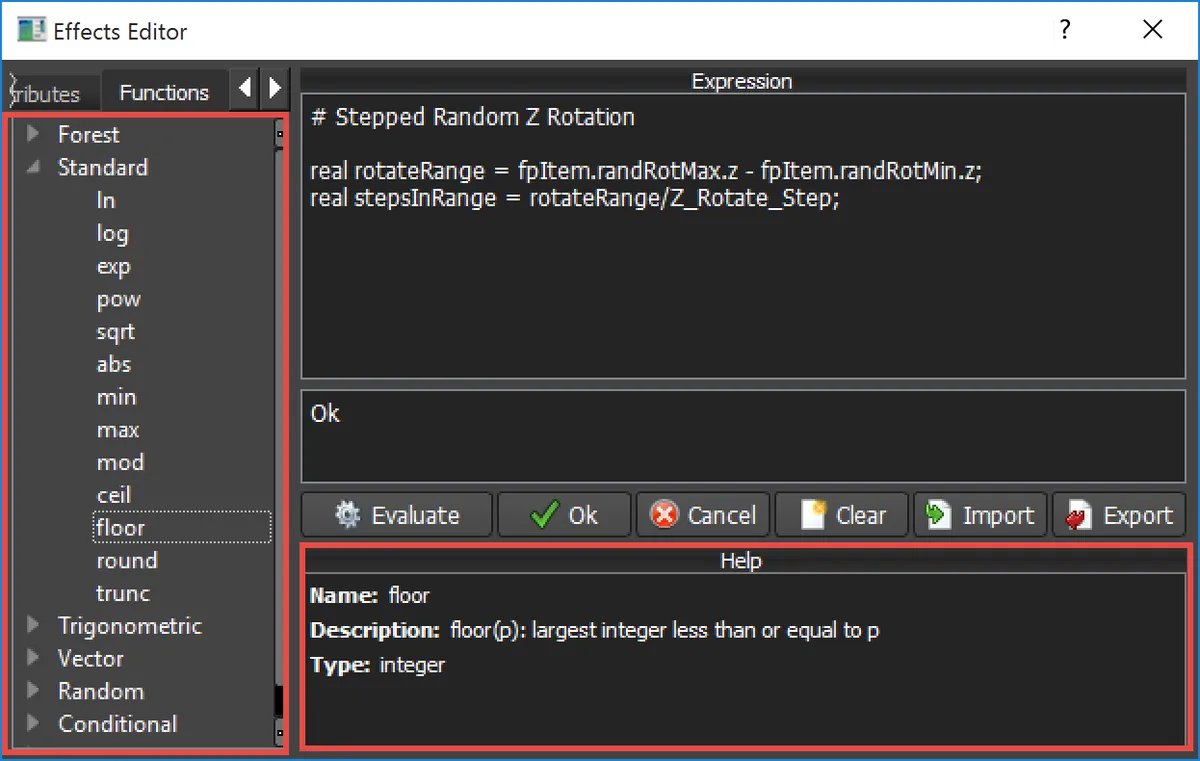
To use a function you enter its name followed by the necessary arguments in parentheses. For example to round 3.33333 down to 3 you would use the function
floor(3.333). In our example we will add a floor function to the existingrotateRange/Z_Rotate_Stepequation, so the line will now read:real stepsInRange = floor(rotateRange/Z_Rotate_Step); -
Now we know how many times the step value divides into the rotation range we can use this value to create random angles and assign them to the scattered objects. To do this we'll create a random number between 0 and StepsInRange and multply this by Z_Rotate_Step. To do add this to the last line of the expressions:
real ZRotation = randomInt(0,stepsInRange)*Z_Rotate_Step;Let's look at each piece of this line.
real ZRotationcreates a new variable of the type Real.randomInt(0,stepsInRange)generates a random integer between 0 and the value stored in the variable stepsInRange- The resultant random number is multiplied by the original rotate Z_Rotate_Steps value to generate the final rotation values.
-
Finally, we need to assign the new rotation values to the ForestPack objects. To do this you use another Attribute -
fpItem.rotation. Because we only need to change the z axis you append a.zto the end to give usfpItem.rotation.z. If you writefpItem.rotation.z = ZRotationyou won't actually get the correct results because we have been calculating the random angle in Degrees, butfpItem.rotationuses Radians. Thankfully it's easy to convert between the two using thedegToRad()expression. So the final line will read:fpItem.rotation.z = degtorad(ZRotation); -
Remember, if you want to see more clearly what the variables are doing, add a Print command for each one. The final script should look like this:
steppedZRotate.eff# Stepped Random Z Rotation
real rotateRange = fpItem.randRotMax.z - fpItem.randRotMin.z;
real stepsInRange = floor(rotateRange/Z_Rotate_Step);
real ZRotation = randomInt(0,stepsInRange)*Z_Rotate_Step;
fpItem.rotation.z = degtorad(ZRotation);
# Print variables for debugging - shows results of 1st Forest item.
print rotateRange;
print stepsInRange;
print ZRotation; -
Click OK to save the expression. Congratulations, you've just created your first effect, and you will now have a new spinner in the effects rollout that you can use to step the Transform Z Randomisation property of ForestPack item. Remember if you want to save this effect to use on other ForestPack objects in the future you can Export it from the Effects editor .
Click to download the .eff file for this example. To load it into Forest Pack follow the procedure described here .