Reference mode
Overview
Reference mode allows you to place objects on markers. A typical usage might be to replace cad objects imported from an architect's plans with trees or other objects. Scattered items retain a dynamic link to reference object, so if the object is moved, the distribution is updated automatically. You also have the choice of whether to place one item on each pivot point of the reference objects, or alternatively, one per face if you're referencing polygonal geometry.
This feature replaces the reference tools found in the Items rollout prior to the release of ForestPack 6
Procedures
To select reference objects
Either:
- Add items individually by clicking on the plus button and then clicking on an item in the scene.
Or:
- Add several items at once by clicking on the Select Multiple Items By Name button . This launches a scene explorer so that you can filter and select reference items.
To delete reference objects
- Click the Delete button to clear all the reference objects.
To scatter one item per reference object
- Enable Distribute Using > Pivot node.
To scatter one item per face
- Ensure that your references are mesh objects.
- Enable Distribute Using > Face node.
To scatter multiple items per face
- Ensure that your references are mesh objects.
- Enable Distribute Using > Face node.
To match the reference objects' orientation and scale
- Enable Scale and/or Align checkboxes.
Interface
Interface components
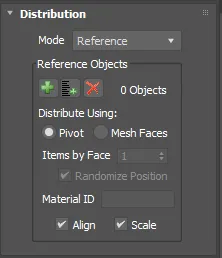
Reference Objects
| icon | Function |
|---|---|
| Add reference objects one at a time by picking them from the scene | |
| Add multiple reference objects, selecting them from a scene explorer | |
| Clear all reference objects |
Distribute using
Determines how items are placed on reference objects. Several modes are available:
- Pivot Point the point of creation is the Pivot Point of the referenced objects. For example: to create a group of trees in specified points, which have been defined in an external program (such as AutoCad) and imported to 3D Studio Max as dummy reference objects. Align and Scale can be enabled to copy the scale and alignment based on the reference.
- Mesh Faces: creates an element for each face of the referenced meshes. If the Align option is enabled, items are aligned with the face, using as X axis a vector from the center to the farthest vertex in the triangle.
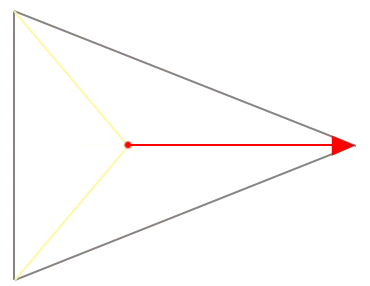
Alignment is calculated using a vector calculated from the center to the farthest vertex.
- Items Per Face: choose the number of items to add per triangle. For values greater than 1 a grid-like distribution on the face is created unless the Randomise Position option is selected
- Material ID. Allows you to scatter on faces only with the specified material ID(s)
- Align. aligns the orientation of the scattered object to match the reference object or triangles
- Scale. scales the scattered object to match the reference object. In mesh faces mode, this setting has no effect.