Path mode
Overview
Path distribution was introduced in ForestPack 6, it enables you to distribute objects at regular intervals along one or more splines. The distribution remains fully parametric, so you can easily adjust the spacing, offset rotation and more at any time.
This feature replaces the Distribute Along Spline feature found in the Tree Editor rollout in versions of ForestPack prior to version 6.
Procedures
To add spline
- Click on the button and select one or more splines by clicking on them in the viewport
To delete splines
- Select the spline to remove from the paths list
- Click the button.
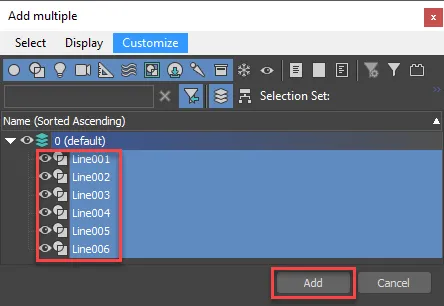
To add multiple splines
-
Click on the button.
-
A scene explorer will open called Add Multiple.
-
Select all the splines you wish to add by holding down CTRL and clicking to select individual splines or using SHIFT and Click to select a range.
-
Click Add
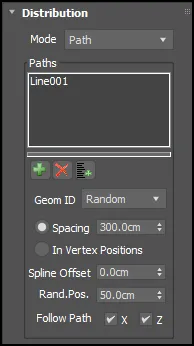
To distribute objects at evenly spaced intervals along spline(s)
- Add splines to the Path List.
- Enable Spacing node.
- Adjust the distance between objects using the Spacing Value.
To distribute objects on the vertices of along spline(s)
- Add splines to the Path List.
- Enable In Vertex positions node.
To align objects to follow the direction of spline(s)
- To rotate objects on the X axis to follow the path enable Follow Path > X. To rotate objects on the Z axis to follow the path enable Follow Path > Z
To offset items parallel to the spline(s)
- Increase or decrease the Offset property.
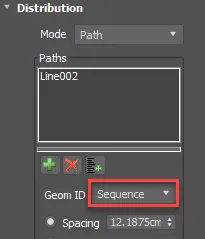
To create a repeating sequence of items
-
In the Geometry rollout, choose the order of items by moving them up and down in the stack using the arrow buttons.

-
Go to the Distribution rollout and enable Path Mode.
-
Add splines to the Splines List.
-
Change Geom. ID to Sequence.
Interface
Interface components
Paths
The paths list allow to to select and manage the splines used in the scene along which items are distributed. Add and remove splines from the list using the buttons:
| Icon | Function |
|---|---|
| Add a single spline to the list | |
| Delete the spline selected in the list | |
| Open a scene explorer window and add multiple splines to the list |
Geom ID
If you have more that one object in the Geometry List, this drop-down menu determines the order in which they are distributed along the spline. Use Sequence to loop through them in the order they appear in the Geometry list or use Random to shuffle the order.
Spacing
In this mode items are positioned at regular intervals along the spline, defined using the distance paramter.
In Vertex Positions
In this mode items are placed on a spline's vertices.
Spline Offset
Offsets the items on the spline. Positive numbers move the items to one side of the spline, negative to the other.
Random Position
Breaks up regular spacing by randomizing the position of items along the path.
Follow Path
This options allow you to rotate the items to follow the path of the spline. There are separate controls for the X and Z axis.