Geometry rollout
Overview
ForestPack Pro enables you to choose from an unlimited number of different objects to scatter, these are managed from the Geometry List. Items can be loaded from the library or picked directly from the scene, any valid geometry object can be used, the table below outlines the types supported by each renderer. There is no need to convert meshes to Proxies, ForestPack use native geometric shaders to automatically creates instances on the fly for compatible renderers.
| Renderer | Supported Objects |
|---|---|
| Scanline | Meshes (or any object that can be converted to mesh). |
| V-Ray | Meshes, V-Ray Proxies, lights and several other non-geometric objects |
| Corona | Meshes, lights and several other non-geometric objects |
| Arnold | Meshes, Procedurals, lights and several other non-geometric objects |
| Octane | Meshes, lights and several other non-geometric objects |
| FStorm | Meshes, FStorm Proxies |
| Redshift | Meshes, Redshift Proxies |
| Arion | Meshes |
| Maxwell | Meshes, Maxwell Proxies |
| Mental Ray | Meshes, MR Proxies and RPC objects |
Procedures
To create a new Forest Object based on a spline area or surface
- Go to Create > Geometry > Itoo Software and click ForestPack Pro. Select a mesh, billboard, or preset by clicking the Select button and picking from the Forest Library . If the object you wish to use is not in the library, skip this step and a simple plane object will be used. This can be adjusted later to use your own custom objects in the Geometry rollout.
- Ensure the mode is set to Generate.
- Click a spline area or surface in the viewport. Go to the Modify panel to access parameters for Add Geometry . Areas . Distribution . Camera . Transforms . Animation and more.
To create a new Forest object using Custom Edit
- Go to Create > Geometry > Itoo Software and select ForestPack Pro.
- Change the mode to Custom Edit.
- Click anywhere in the scene to place trees.
- When you are finished, right click to exit create mode. Further parameters such as Add Geometry . Surface . Camera . Transforms . Animation and more can now be adjusted in the modify panel, to further add or modify objects please see the Item Editor reference.
To add a new object to the Geometry list from the library
-
Create a new Forest Object as described above.
-
Open the Geometry rollout and click (Add New Item).
-
The properties section determines the type of geometry to create, to load an object from the library, Click on
.
-
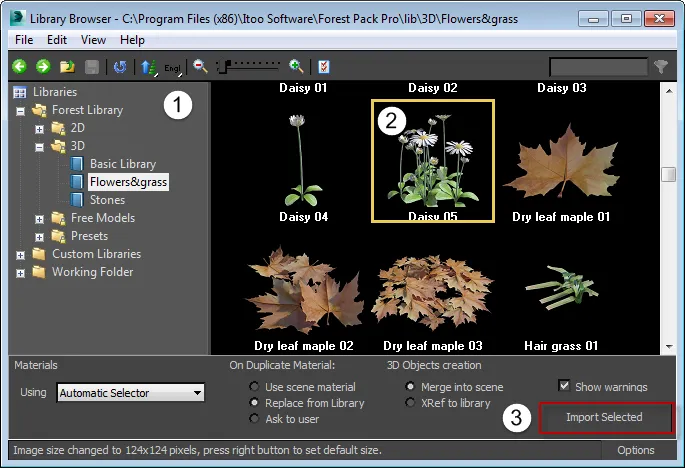
The library browser will open, use the directory navigator on the left of the interface to select a library, then pick the desired object from the items view.

-
To use the selected object, either double click, right click and select Use Item(s), or click Import Selected.
To add a new Billboard object to the Geometry List
-
Open the Geometry rollout and click on (Add New Item).
-
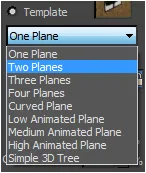
From the Properties section select Template and set the type of billboard geometry from the drop-down list.

-
Set the Width and Height. To constrain proportions click
(Lock Aspect Ratio) found to the right of the spinners.
-
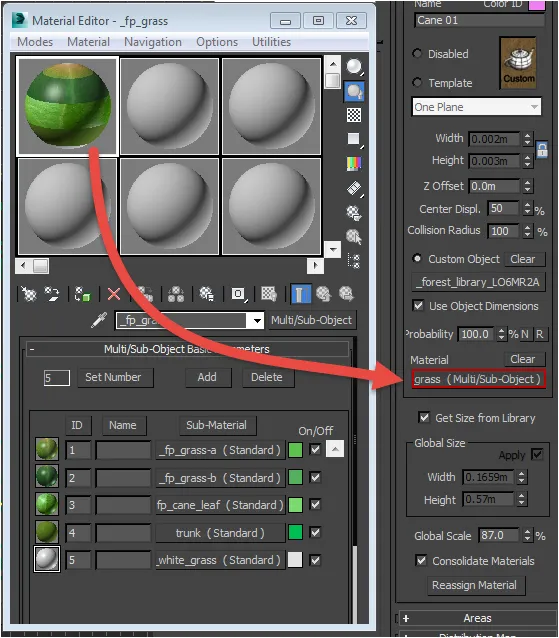
Apply a material to the planes by dragging or copy and pasting an instance to the Properties > Material pick button. Ensure you assign the material to this button, not the Forest object itself. Forest automatically manages a multi-sub object material based on the materials assigned in the Geometry List rollout. If you do accidentally overwrite this, recover it by clicking . See the reference section below for more information.
-
If necessary, move the pivot position used for rotation by adjusting the Centre Displacement value. This is measured as a percentage of the overall billboard width.
To add a new geometry object to the Geometry List
- Open the Geometry rollout and click on (Add New Item).
- The Custom Object picker button (marked "none") will be automatically selected. Pick an object to be scattered from the scene. Any materials applied to the object will be retained.
To add lights and other non-geometric objects to the Geometry List
- Open the Geometry rollout and click on (Add New Item).
- The Custom Object picker button (marked "none") will be automatically selected. Pick an object to be scattered from the scene. Any materials applied to the object will be retained
- Some objects will be detected as geometry even though they are not. If this is the case enable the Non-Geometric
Object option

To add a group to the Geometry List
Adding groups must be done using the name selector. Max does not support picking groups from the scene. A group can be added in two ways.
Either:
- Open the Geometry rollout and click (Add New Item).
- From the Properties section, change the geometry type from template to Custom Object.
- Click on the Custom Object picker button (marked "none") . Groups cannot be selected by clicking on them in the scene, instead open the Select From Scene dialog by pressing H on the keyboard. Select a group from the list and either double click or press the Use button.
Or:
- Click (Add Multiple Custom Objects) from below the geometry list, this will automatically open the pick from scene geometry list.
- Select either a single or multiple groups from the list and click .
This mode is useful to scatter groups of objects, preserving their composition, for example clumps of plants like flowers or grass. It works well when used in combination with Distribution > Diversity > Clusters.
Once scattered elements of a group are handled as individual items, both for the boundary checking and surface placement. This also has a noticeable impact on the number of items generated, so care should be exercised when scattering groups that contain many objects.
Do not use groups for objects that must be handled as a unique object (for example a tree and its leaves). In this case, attach all the individual parts into single mesh.
To add a blank object to the Geometry List (to create gaps)
To create blank spaces or gaps in a scatter, null objects can be added to the geometry list. This will be taken into consideration as part of the distribution but no geometry will be generated.
- Open the Geometry rollout and click (Add New Item).
- From the Properties section, change the geometry type from template to "Disabled".
- Change the probability of a null object being selected using the Properties > Probability parameter.
To add multiple objects to the Geometry List
- Open the Geometry rollout and click (Add Multiple Custom Objects).
- Select the objects to use from the list. To select multiple object from the list either select individually while holding down control, or select a range by clicking the first object then hold down shift and click the last object.
- Click to use the selected objects.
OR
- With a Forest Object selected, go to the Geometry rollout
- Click the Pin Stack button . This will allow you to keep the Forest Interface in the Modify panel even when you select other items.
- Select all the items you wish to scatter.
- Click on Add New Item button in ForestPack's Geometry rollout 5. All the selected items will be added to the Geometry list.
- Reselect the Forest object and turn off Pin Stack
To delete and object from the Geometry List
- Select the item from the Geometry List.
- Press (Delete Item).
To Copy and Paste objects
- Select the source item from the geometry list.
- Click (Copy item values).
- Select the target item, or create a new one by clicking (Add New Item).
- Click (Paste item values).
To change the order of objects
When using forest in custom edit mode items can be created in a sequence instead of randomly selected from the geometry list. When using this feature it is helpful to be able to rearrange the order of the objects in the Geometry list.
- To move an object up the Geometry list, select it and click on (Move up).
- To move an object down the Geometry list, select it and click on (Move down).
To manually set the height and width of a billboard or custom object
-
Select an item from the Geometry List.
-
If the item is a Custom Object, turn off Use Objects Dimensions.
-
Use the Width and Height parameters to set a new size for the object.

-
By default, the Width and Height are constrained maintain proportions, uncheck (Keep Aspect Ratio) to change the width and height independently.
To manually set the height and width of all objects
- Turn on Global Size>Apply.
- Adjust the Global Size > Width and Height parameters, all items in the geometry list will use the new values.

To adjust the size of all objects, retaining the original proportions
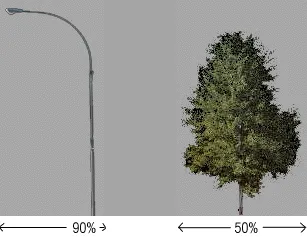
Adjust the Global Scale value, measured as a percentage of either the items original size, or as set in the Properties > Width and Height parameter. The default scale value is 100%.
To assign a color ID
- Select an object from the Items List.
- Click on the Color ID color swatch to open the 3DS Max color picker.
- Select a new color and click OK.
- Turn on Display > Viewport > Use Color ID to display the color in the viewport, or see the Distribution Map reference to see how to use Color IDs in conjunction with RGB maps to place items.
To assign a material to an object
To apply a material to an object in the Items List, select the item from the list then drag a material from the Slate or Compact Editor to the Properties > Material Name slot.

To rebuild materials if accidentally overwritten
Since any object in Max can only have one material applied, ForestPack Pro automatically creates a Multi/Sub object material based on the materials assigned to each individual item in the Geometry List. If accidentally overwritten or lost, simply press to recreate the Forest auto-material.
To adjust the probability of an object being used
To manually adjust the chance of an item from the Geometry List being selected, modify the percentage in Properties > Probability. This value will be displayed next to the item's name in the list.
The percentages are normalized automatically in the background. If you wish to display these values, click
(Normalize). To assign randomized values to all objects in the Geometry List, click (Randomize).
Interface

Geometry List
Description of the geometry list
| Icon | Function |
|---|---|
| Add object to the Geometry List | |
| Remove selected object(s) from the Geometry List | |
| Add multiple objects to the Geometry List | |
| Copy selected object(s) | |
| Paste objects(s) | |
| Move selected object(s) up/down |
Properties group
Library
Opens the Forest Library allowing you to import individual 3d meshes, billboards and complete presets.
Get Size from Library
When on an item will inherit Width, Height, Z Offset, and Center Displacement values from the library. When unselected only the material is imported.
In ForestPack 4.3 this option is removed and enabled by default
Color ID
Used to define the color of items in the viewport when Display
Viewport > Use Color ID is active. This parameter can also be used in conjunction with Image Mode Diversity > Match Color ID on Map. This mode allows you to place items according to pixel information most closely matching the Color ID on a bitmap or procedural map.
Name
Shows the name of the selected item. The name updates automatically to match the source geometry but can also be edited manually.
Disable
Disables geometry for the selected item. This is not the same as deleting the item, it will still be taken into consideration as part of the scatter algorithm, but will not render leaving a space.
Template
Use a predefined geometry template from the drop-down list. Used for billboards, for 3d geometry use the Forest Library
It is possible to create your own templates by editing an index.dat text file and using standard Max scenes for the meshes, see Installation and customisation for details.
Custom Object
Use a custom mesh. Click this button to select the source object from the scene. when an object is selected the button will display the source name, otherwise it will return None. To delete references to the source, click Clear.
Use Object Dimensions
When on, objects use the size of the source object. When off the size is defined by the Width and Height values.
From ForestPack 4.3 this option is removed. To resize custom objects use the Scale value.
Scale
Set the scale of a custom object. Measured as a percentage of its original size.
Width
Set the width of Billboards. (use to constrain proportions)
Height
Set the height of Billboards. (use to constrain proportions)
Z Offset
Sets an offset value on the Z Axis, measured in scene units.
Center Displace
Adjust the lateral pivot position. Useful when using billboards which can rotate on the Z axis to keep them facing toward the camera. Use this value to adjust the rotation point for textures that require an offset pivot.

Collision Radius
Defines the collisions radius for the selected item. This value is multiplied by the global radius parameter found in the Distribution Map rollout, to compute the distance between objects to detect a collision.
Probability
Defines a percentage probability that the item will be selected in the random distribution. If the sum of all the probabilities in the Geometry List exceeds 100%, the values are normalized internally by the distribution algorithm. You can also use the to normalize the list manually and
to randomize the values.
Material
Used to assign a material to the selected item.
ForestPack needs to build a single multi-sub object material combining all the materials applied to the items in the Geometry List. Because creating this material and correctly assigning the material IDs manually would be a complex and time-consuming procedure, ForestPack performs this action automatically.
Subsequently, applying materials to items is very different compared with the normal workflow in 3DS Max. The material is NOT applied directly to the object using the Material Editor, but instead selected as a parameter in the Geometry rollout, using the "Material" pick button.
For Custom Objects, if material is not specified, ForestPack uses the material assigned to the source object.
If you accidentally assign another material to a Forest object, use the "Reassign Material" button to recover the auto-material.
Include Children
If you are using hierarchies, enable this to import the children of the selected object. Internally, they will be treated as a group by ForestPack
- Because of technical limitations, child items cannot be imported from the Library.
- Geometry->"Keep Group" can be used with hierarchies ("Include Children" option).
- Animation of the children is supported when using ForestPacks animation features
Keep Group Hierarchy
Enable this to treat groups as though they were a single object. When this is enabled all objects in the group will receive the same random transforms and will be culled as one. When disabled each item in the group is randomly transformed and culled individually.
Non-Geometric Object
Enable this when scattering a non-geometric object but ForestPack has detected it as standard geometry.
Global Size group
In ForestPack 4.3 this option is removed although these parameters can still be accessed using maxscript using ("globsize", "width", "height")
Apply
When on, all items take the Height and Width defined in the Global Size group settings. When off Items use their individual height and width settings
Width
Defines the global width value.
Height
Defines the global height value.
Global Scale
Applies a global scale factor to all items in the Geometry List.
Consolidate Materials
Is possible to disable the automaterial feature and assign the materials manually, although is not recommended. For this, uncheck the "Consolidate Materials" parameter in the Geometry rollout.