Forest Lister
Overview
Forest Lister simplifies the management of scenes that contain multiple ForestPack objects. It comprises a simplified interface allowing you to rename, enable/disable, hide/unhide, and select Forest objects, display useful information, and speed up editing properties. To access Forest Lister:
- Select any ForestPack object.
- Open the General rollout.
- Click to open the Forest Lister window.
Or:
-
Click the button from the ForestPack toolbar
 ForestPack Toolbar
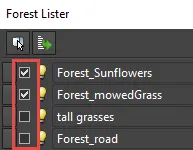
The interface consists of a table view of all Forest objects in the scene with a row for each object and a column for each of the commonly used rollouts. Each rollout is represented by a Label which displays relevant information and also acts as a button to take you to the modify panel so that you can edit the object's parameters. Forest Lister's layout can be customised to show only the columns you need and change their order, for example for still images you may want to hide the Animation column as it's not required, in this way the interface can be customised to suit your individual workflow.
Procedures
To select a Forest object using Lister
To select a Forest object using Forest Lister you have 2 options, either:
- Click any Label and Forest Lister automatically selects the ForestPack object.
Or:
-
Highlight a Forest object by activating the Selection Marker in the first column and then click
.

To pick multiple Forest objects using Selection Markers
-
Forest Lister allows you to easily select multiple Forest objects using Selection Markers. these are the buttons in the first column that are highlighted blue when clicked to indicate a Forest object has been selected. You use markers with the following mouse and keyboard combinations:
- Ctrl + Left Click to add. Forest objects to the selection.
- Alt + Left Click to remove. Forest objects from the selection.
- Right Click to clear the current selection.
- Left Click and then Shift + Left Click to select a range.
- Click. . to select all Forest objects in lister.
- Click. . to deselect all currently selected objects.
-
Marking objects in the lister does not automatically select them in the scene. To select marked objects, click the button.
To edit a Forest object's properties
- Click any Label. Forest Lister automatically selects the ForestPack object and takes you to the relevant rollout in the modify panel.
To edit multiple Forest object's properties
In this release it is only possible to batch modify the Enable/Disable, Hide, and Display Mode properties. In future releases we will extend this function to include other parameters.
- Use Selection Markers to highlight the Forest objects you intend to edit (see above). There's no need to select them in the scene, they only need to be highlighted in Forest Lister.
- Change the enable/disable, hide/unhide or display mode settings in Forest Lister.
To display a Forest object's statistics
-
Click next to the Forest object's name to display its statistics. If an object is in an error state the sphere will display red
instead of green. A warning is signified by an orange sphere .
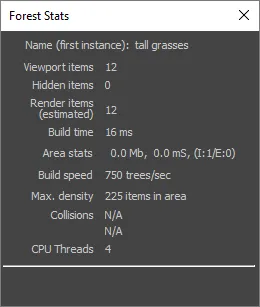
-
To close the window you can either click the sphere a second time or use the close button.
To change display mode
-
Choose a display mode using the drop-down list. Note that there's no need to select the ForestPack object first.

-
To change the display mode of multiple ForestPack objects, highlight them first using Selection Markers (see above)
To enable or disable a Forest object
-
Click on the checkbox in the second column
-
To enable/disable multiple ForestPack objects, highlight them first using Selection Markers (see above)
To hide or unhide a Forest object
-
Click on the lightbulb icon in the third column
-
To hide/unhide multiple ForestPack objects, highlight them first using Selection Markers (see above)
To rename a Forest object
- Click in the Name field and enter a new value.
To synchronise lister with the Max selection
- To synchronise the selection markers in the lister so that they match the Forest objects selected in the scene, click
To show/hide hidden Forest objects in the lister
- Click the gear icon to open the Settings menu.
- Turn on Include hidden objects to show hidden Forest object's in the lister. If you'd prefer to see only visible objects, leave this option unselected.

To add columns
- Click the gear icon to open the Settings menu.
- Select the column you wish to add from the Exclude List on the left hand side.
- Click the Add button.
To remove columns
- Click the gear icon to open the Settings menu.
- Select the column you wish to remove from the Include List on the right hand side.
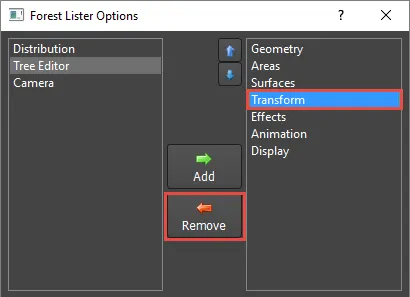
- Click the Remove button.
Interface
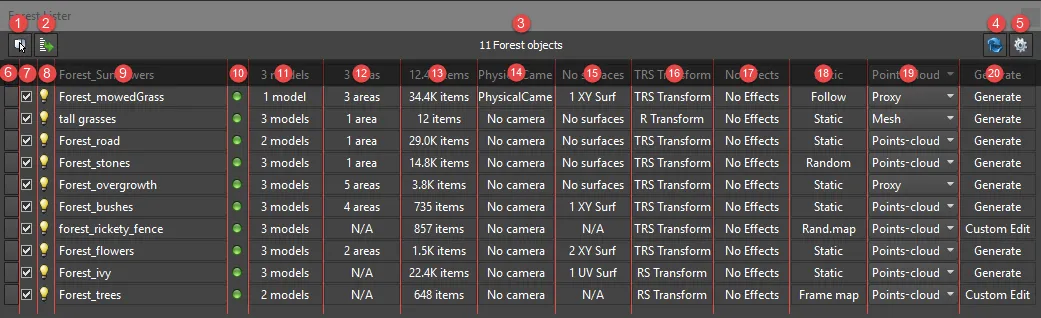
Forest Lister
- Select. selects the Forest objects in the scene that have been highlighted using Selection Markers (6).
- Synchronise with Max Selection. highlights the Selection Markers for the objects in Forest Lister that are currently selected in the scene.
- Number of Objects. displays the number of Forest objects managed in Forest Lister.
- Refresh. forces a manual update of Forest Lister. Use this in the rare event that Lister and the scene are out of sync.
- Settings. opens the settings menu (see below).
- Selection Marker. click this to select Forest objects in the Lister. Note that this does not also select the objects in the scene unless you click .
- Enable/Disable. toggle the Forest object on or off.
- Visible. Hide or Unhide the Forest object.
- Name. Used to display and edit a Forest object's name.
- Statistics. Displays the health of the Forest object: = OK, = Warning, = error. Click the label to open the Forest Stats window for more information.
- Geometry. Displays the number of entries in the Items List. Click the label to open the Geometry rollout.
- Areas. Displays the number of areas used. Click the label to open the Areas rollout.
- Distribution. displays the number of scattered items. Click the label to open the Distribution rollout.
- Camera. displays the name if the camera assigned to the Forest object or No Camera if none is used. Click the label to open the Camera rollout.
- Surfaces. displays the number and type of surfaces used by the scatter. Click the label to open the Surfaces rollout.
- Transforms. displays types of Transform randomisation used: T translation, R. Rotation, S. Scale. Click the label to open the Transform rollout.
- Effects. displays Effects On if an effect is loaded and active or No Effects if this feature is not used. Click the label to open the Effects rollout.
- Animation. displays the type of Animation control used: Static disabled, Follow geometry, Random samples, Rand.Map random from map, Frame Map frame from map. Click the label to open the Animation rollout.
- Display Mode. displays the current display mode. The parameter can be changed directly in the Lister using the drop-down list.
- Edit Mode. displays the Forest object's distribution mode. Click the label to open the Tree Editor rollout.
The columns and their order may be different for your configuration. To change these options, open Settings by clicking
Settings
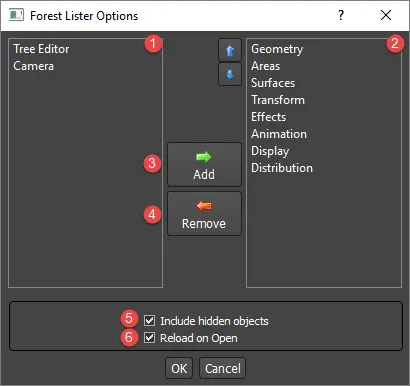
The settings menu is used to configure the columns that are displayed in the Lister window. Use the left and right arrows to add or remove columns, and the up and down arrows to change their order.
- Exclude list. contains the columns that are not shown in Forest Lister.
- Include list. contains the columns that are shown in Forest Lister.
- Add. moves the selected item in the Exclude list to the Include list.
- Remove. moves the selected item in the Include list to the Exclude list.
- Include hidden objects. When active the lister shows all Forest objects, even if they're hidden. If the checkbox is disabled hidden Forest objects will not be seen.
- Reload on Open. forces Lister to automatically refresh when it is opened. Can slow down scenes with over 100 Forest objects