Effects Interface
In Forest Pack 6 and onwards you'll find a revamped Effects rollout. Using this simple interface you can control the parameters of any effects loaded into the FP object. From here it is also possible to open the Effects Browser to load presets or open the Editor to create or edit effects. The interface comprises three parts:
The Effects Rollout
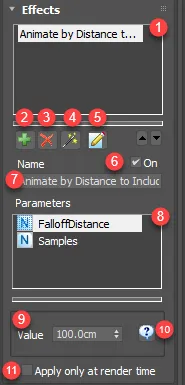
Use this interface to control effects parameters, and open the library and editor windows.
- The Effects List. lists all the effects in the current object. Select an effect to see its properties
- Add Effect. click this button to create a new empty effect.
- Delete Effect. click this button to delete the selected effect.
- The Effects Library. click this button to open the Library and load pre-built effects.
- The Effects Editor. click this button to open the Effects Editor used to create and edit effects scripts.
- On/Off. Use this checkbox to toggle all effects on or off.
- Effect Name. used to name effects for easy identification
- Parameters List. this list contains all the user editable values in the loaded effects.
- Parameter Value. used to enter a value for the parameter highlighted in the Parameters List.
- Parameter Help. displays an explanation of the parameter highlighted in the Parameters List.
- Apply Only at Render Time. activate this to apply the effect only at render time - this can speed up editing FP objects with complex processor intensive effects.
The Effects Library
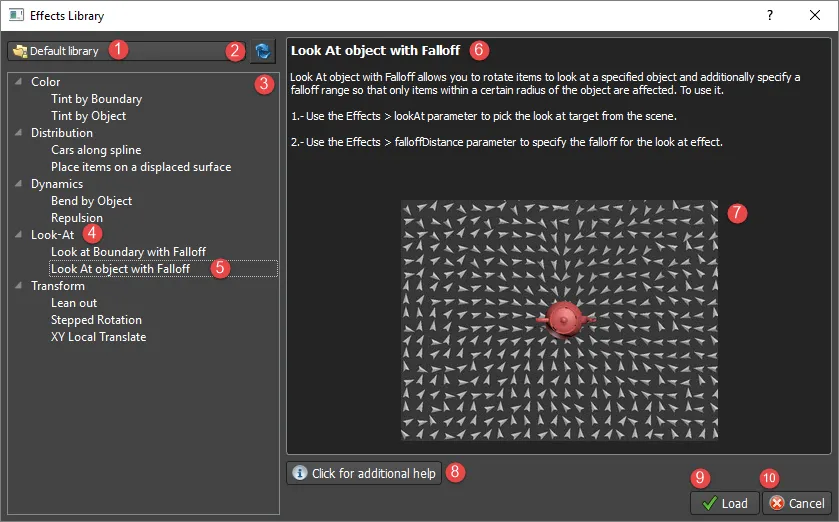
- Library Menu. drop down list to Select the library. By default, you have two libraries, the Default library for built-in effects and a User's library for your own effects.
- Refresh. click to refresh the effects' navigator. This is usefully if you've made changes to the library manually in a file manager, and you'd like to see these updates in the Effects Browser.
- Effects Navigator. displays a tree view of your selected library
- Category. category is a way of organising your effects. Categories can be nested.
- Effect. An individual .eff file. Click to see more information about the effect.
- Description. Shows a text description and instructions of the selected effect.
- Preview Image. An image to illustrate the selected effect
- Click for additional help. Click this button to go to online help for more information about the selected effect. For iToo effects this takes you to our documentation server.
- Load. Click this button to load the selected effect.
- Cancel. Click this button to close the Effects Browser without making any changes.
The Effects Editor
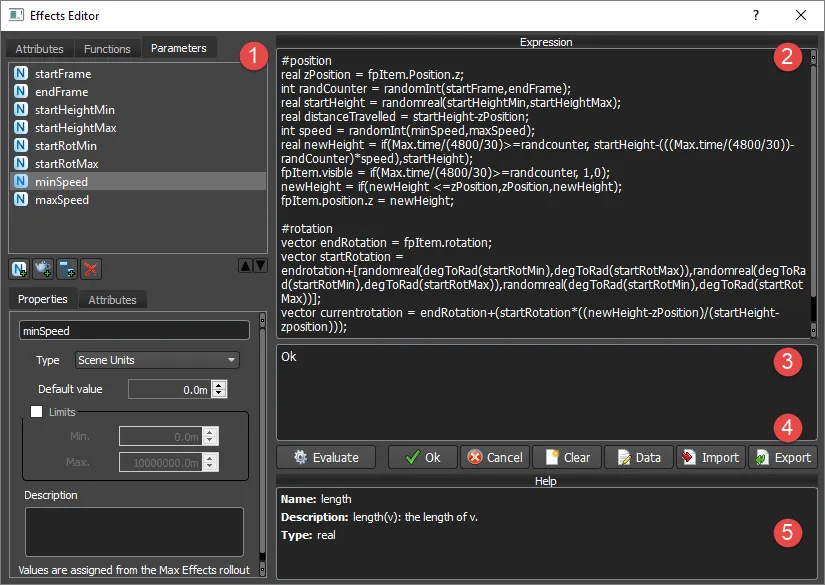
Use the Effects Editor to author new effects.
- Command List. this 3 tabbed directory contains all the commands that are available to be used to create effects expressions. Click a command in this list one to show the help (5) or double click to insert the command at the current cursor point.
- Expression Window Use this window to create and edit a new effect,
- Output Window. Shows the results of the expression, and any error or other system messages.
- Toolbar: contains buttons to save, evaluate and manage effects. Includes the following buttons:
- Evaluate. Click to run the script in the expressions window.
- OK. Click to run the script in the expressions window and close the editor.
- Cancel. Close the editor without running or saving the script.
- Clear. Delete the contents of the Expression Windows.
- Data. . Open the Additional Data Menu to add a name, description and thumbnail image (see below for more details).
- Import. Open an effects file (.eff) replacing the contents of the expressions window.
- Export. Save an effects file (.eff).
- Help. thows help and information for the item selected in the command list.
The Parameters Tab
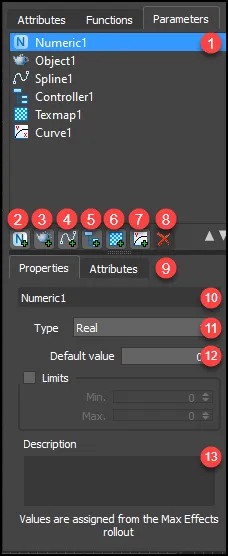
Use the Parameters tab in the Effects Editor to create variables whose values are assigned and edited from the Effects Rollout.
- Parameters List. contains all the parameters for this Forest object.
- Add new Numeric Parameter. create a new Numeric Parameter. The value for this is edited in the Effects rollout.
- Add new Object Parameter. create a new Object Parameter. Allows you to use the position of other objects in the scene to influence Forest's properties. Assigned from the Effects rollout.
- Add new Spline Parameter. create a new Spline Parameter. Allows you to use a spline in the scene to influence Forest's properties that is not linked to distribution. Assigned from the Effects rollout.
- Add new Controller Parameter. create a new Controller Parameter. Allows you to use any other object's controller to influence Forest's properties. Assigned from the Effects rollout.
- Add new Texture Parameter. create a new Texture Parameter. Allows you to use any a map to influence Forest's properties. Assigned from the Effects rollout.
- Add new Curve Parameter. create a new Curve Parameter. Allows you to use a curve to influence Forest's properties. Assigned and edited from the Effects rollout.
- Delete Parameter. delete the item highlighted in the Parameters List.
- Properties Tab. thow the properties and attributes of the item highlighted in the Parameters List.
- Parameter Name. name of the Parameter selected in the Parameters List.
- Parameter Type. changes the type of value used for Numeric Parameters.
- Default Value. the default value used for Numeric Parameters.
- Limits. limit the values that can be entered within the minimum and maximum values
- Description. this description can be viewed in the Effects rollout by clicking the Help button. Add instructions here to help explain an effects parameters for new users.
Additional Data menu
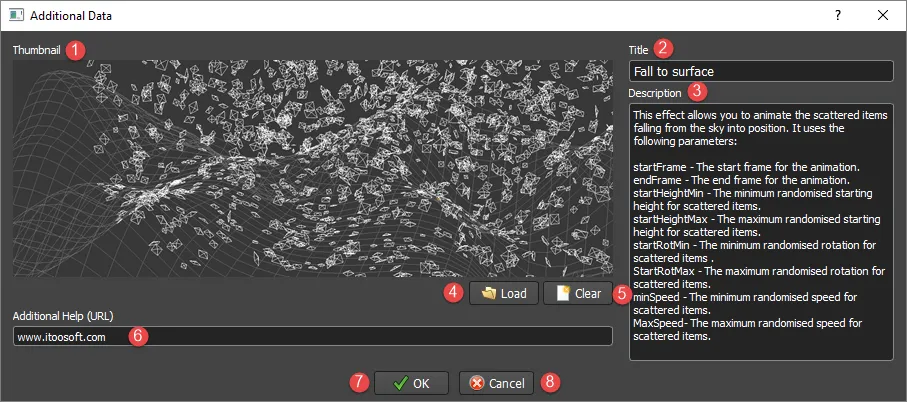
- Thumbnail. displays a preview of the selected effect. The browser does not rescale images, so it's recommended to save them in a size that's appropriate.
- Title. the name of the effect to be displayed in the Effects Navigator. If you leave this field blank the file name will be used.
- Description. add additional information about the effect such as a description and instructions for use.
- Load. click to select a preview image file in the format png, jpg, or xpm. The image is encoded in the .eff file so there's no need to include it if you share your files.
- Clear. click to remove the current preview image.
- Additional Help (URL). used to add a URL that can provide additional online help or information about the author.
- OK. Click OK to save changes to the effect and return to the browser.
- Cancel. click Cancel to return to the browser without saving any changes.